Flooring Advice

how-to-make-hardwood-floors-shine
Flooring Advice

Make Hardwood Floors Shine: The Ultimate DIY Guide

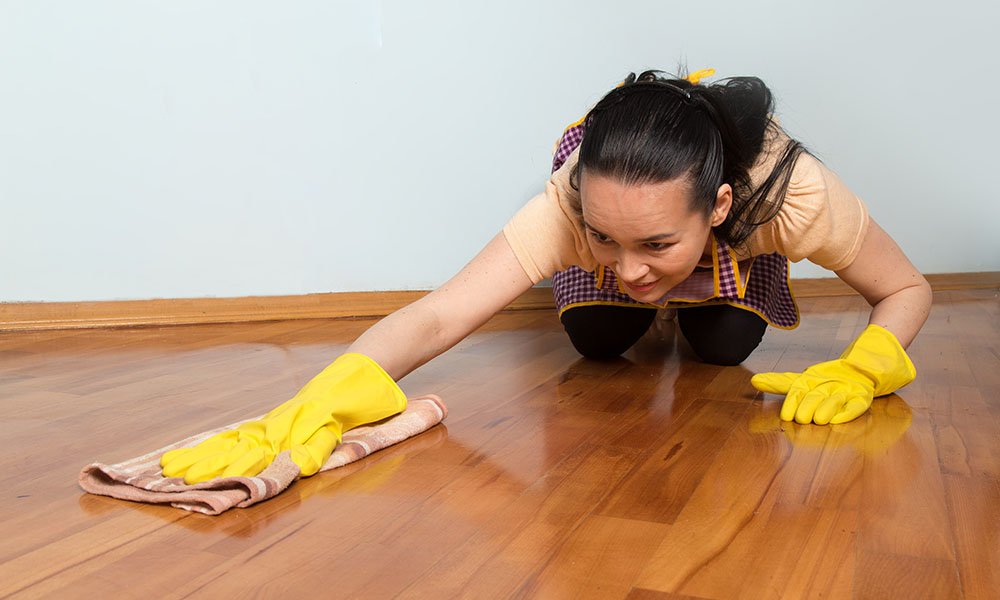
Hardwood floors add warmth, elegance, and timeless beauty to any space. But achieving that coveted shine and maintaining it requires more than a quick mop. Dust, scuffs, and dullness can rob your floors of their brilliance, leaving you searching for the ultimate solution. This guide tackles your concerns head-on, providing expert tips and techniques to restore and maintain the radiant finish of your hardwood floors. Say goodbye to lackluster surfaces and hello to dazzling, head-turning floors! Getting Started: Preparing Your Hardwood Floors for a Shine Preparation is key to ensuring your cleaning efforts yield sparkling results. Follow these steps for a flawless foundation: Step 1: Sweep or Vacuum Thoroughly Remove loose dirt, dust, and debris that can scratch the surface. Use a soft-bristled broom or a vacuum with a hardwood floor attachment to gently clean the area. Avoid using rotating brushes or harsh vacuums that can damage the wood. Step 2: Pre-Treat Stubborn Stains Address stains before mopping to prevent setting. Use a hardwood-safe cleaner or a mild dish soap solution to treat problem areas. Always test the cleaner in a hidden spot to ensure compatibility with your floor’s finish. The Deep Clean: How to Make Hardwood Floors Shine Step 1: Mix a Hardwood-Friendly Cleaning Solution Combine warm water with a hardwood-safe cleaner or a vinegar-water solution (1:4 ratio). Avoid overly acidic solutions, which can strip the finish. Adding a few drops of essential oil can enhance the scent. Step 2: Mop Correctly Use a microfiber mop dampened (not soaked) with your cleaning solution. Excess water can damage hardwood, so wring out the mop thoroughly. Work in small sections and overlap strokes for even coverage. Step 3: Let the Floors Dry Naturally Allow the cleaned floor to air dry completely. Avoid fans or heaters, which can dry the wood too quickly, causing cracks or warping. Advanced Techniques: For a Stellar Shine Achieving a dazzling shine on your hardwood floors often requires going beyond regular cleaning. Advanced techniques like buffing and polishing can significantly enhance the look and longevity of your floors, transforming dull surfaces into gleaming masterpieces. Buffing Your Hardwood Floors Buffing is an excellent way to restore a hardwood floor’s natural luster while addressing minor imperfections like light scratches and scuffs. Start by ensuring the floor is clean and free of dust or debris. Use a soft-bristled brush attachment or a specialized floor buffer for best results. Always work in the direction of the wood grain to maintain a consistent finish and avoid leaving swirl marks. Polishing for Extra Sparkle Polishing adds an extra layer of protection while amplifying your floor’s shine. Choose a high-quality hardwood floor polish that matches your flooring’s finish, whether it’s matte, semi-gloss, or high-gloss. Apply the polish using a microfiber applicator or a clean, soft cloth. Work in small sections, spreading a thin, even coat, and always follow the manufacturer’s instructions. Allow the polish to dry completely. Maintenance: Keeping Your Hardwood Floors Shining Long-Term Consistent maintenance is key to preserving the beauty and shine of hardwood floors. A few small habits can go a long way in protecting your investment and minimizing the need for intensive cleaning or repairs. Regular Cleaning Dust, dirt, and debris act like sandpaper, gradually dulling your floor’s finish over time. To combat this, sweep or vacuum your hardwood floors weekly, paying extra attention to high-traffic areas like entryways and hallways. Use a vacuum cleaner with a hardwood floor attachment to avoid scratching the surface. Spot Cleaning Spills and stains are inevitable, but addressing them promptly can prevent permanent damage. Use a soft, absorbent cloth and a hardwood-safe cleaner to gently clean the affected area. Avoid using harsh chemicals or abrasive scrubbers, as these can damage the finish. Protective Measures To shield your floors from daily wear and tear, invest in protective solutions. Place rugs or mats at entryways to catch dirt and moisture before it reaches your floors. Use runners in high-traffic areas to minimize abrasion. Furniture pads are essential for preventing scratches from chairs and tables, especially in frequently used spaces like dining rooms. If you have pets, regularly trim their nails to avoid claw marks. Final Thoughts Making hardwood floors shine is achievable with the right approach. By investing time in proper preparation, cleaning, and maintenance, you can enjoy beautiful, gleaming floors for years to come. Consistency is the secret: don’t wait for the shine to fade before taking action. With this ultimate DIY guide, you’re equipped to transform dull floors into radiant masterpieces. Now grab that mop and let the sparkle begin! At Cardenas Flooring, we specialize in maintaining and enhancing the elegance of hardwood floors. Whether it’s deep cleaning, repairs, or a complete refinishing, our experts have you covered. Contact us today to schedule your service and give your floors the care they deserve! FAQs How can I protect my hardwood floors from scratches? To protect your hardwood floors from scratches, place furniture pads under all furniture legs to prevent scraping. Use rugs or mats in high-traffic areas like hallways and entryways to catch dirt and debris that can cause abrasion. Regularly trim pet nails to minimize the risk of scratches. Avoid dragging heavy furniture across the floor; instead, lift and place it carefully. Routine cleaning to remove grit and dust also helps maintain the floor’s surface and prevents tiny scratches from developing over time. Can I use vinegar to clean my hardwood floors without damaging them? Yes, but it must be diluted properly. A mixture of one part white vinegar to four parts water is generally safe for sealed hardwood floors. However, avoid using undiluted vinegar or using it too frequently, as its acidity can strip away the protective finish over time. Always follow up with a dry microfiber cloth to ensure no moisture remains. Before widespread use, test the solution in an inconspicuous area to confirm it’s compatible with your floor’s finish. How do I remove cloudy spots or streaks from hardwood floors? Cloudy spots or streaks often result from excess cleaner or moisture left

stop-furniture-from-sliding-on-hardwood-floors
Flooring Advice

How to Stop Furniture from Sliding on Hardwood Floors: Comprehensive Solutions

Picture this: your stylish armchair has drifted several inches from its intended spot, or your dining chairs are always in disarray after one meal. It’s not just inconvenient, it risks damaging your beautiful hardwood floors and even causing accidents. The good news? There are reliable solutions to keep your furniture in place. This guide explores practical methods to stop furniture from sliding on hardwood floors, helping you maintain a secure and visually appealing space. Why Does Furniture Slide on Hardwood Floors? Sliding furniture is primarily caused by the smooth surface of hardwood floors, which offers minimal friction against furniture legs. Factors contributing to the problem include: Lightweight Furniture: Lighter pieces are more prone to shifting. Small or Smooth Furniture Feet: Narrow or slick bases provide less grip. Daily Use: Movement from sitting, leaning, or rearranging furniture exacerbates the issue. Humidity Levels: Fluctuating humidity can affect the slipperiness of hardwood floors. Understanding the cause helps in selecting the most effective solution for your needs. Effective Solutions to Stop Furniture From Sliding on Hardwood Floors 1. Use Rubber Grippers for Maximum Traction Rubber grippers are among the best solutions for heavy furniture. These pads stick to the bottom of furniture legs, creating a strong grip on the floor without damaging the surface. Look for grippers specifically designed for hardwood floors to ensure compatibility. 2. Apply Felt Pads for Gentle Protection Felt pads are easy to attach and provide a soft barrier between furniture legs and the floor. While excellent at preventing scratches, they may not provide enough friction for heavier or frequently moved pieces. 3. Invest in Furniture Grippers for Versatile Use Furniture grippers combine the benefits of felt pads and rubber backing, making them ideal for both heavy and lightweight furniture. They are discreet and effective, making them a popular choice for many homeowners. 4. Place Rug Pads Under Furniture A high-quality rug pad can prevent sliding furniture while adding a layer of cushioning to your space. These pads are particularly effective for pieces sitting on area rugs, preventing both the rug and furniture from shifting. 5. Use Non-Slip Shelf Liners for a DIY Fix Non-slip shelf liners can be cut to size and placed under furniture legs for an inexpensive yet effective solution. They’re perfect for temporary setups or lighter furniture. 6. Secure Sliding Drawers and Cabinets Sliding isn’t limited to freestanding furniture—drawers and cabinets can also pose a problem. Install drawer stops or cabinet locks to prevent damage to floors and ensure the safety of your items. DIY Solutions: Creative and Cost-Effective Options to Prevent Furniture from Sliding Preventing furniture from sliding on hardwood floors doesn’t have to break the bank. With a bit of creativity and readily available materials, you can implement DIY solutions that are both budget-friendly and effective. Here’s a closer look at these options, with tips for maximizing their benefits. 1. Rubber Bands: A Quick and Flexible Fix Rubber bands are a surprisingly effective way to stop furniture from sliding. Simply wrap one or two thick rubber bands tightly around the bottom of each furniture leg. The rubber adds a layer of friction between the furniture and the floor, reducing the chances of slipping. This solution is particularly useful for lightweight furniture like dining chairs or side tables. Rubber bands are also easy to adjust or replace, making this a perfect quick fix for temporary setups or rented spaces. 2. Cork Pieces: Eco-Friendly and Gentle on Floors If you’re aiming for a sustainable option, cork is a great choice. Cut small pieces of cork from an old corkboard or wine corks and attach them to the bottom of furniture legs using adhesive or double-sided tape. Cork is naturally non-slip and soft, which helps grip the floor while protecting it from scratches. 3. Hot Glue Dots: Customizable Friction on a Budget Hot glue isn’t just for crafting; it can be a clever way to add grip to your furniture. Apply small dots of hot glue evenly to the bottom of each furniture leg. Once the glue dries, it forms a rubbery texture that provides friction and helps keep furniture in place. This method is ideal for heavier pieces that don’t require frequent movement. 4. Adhesive Strips: A Versatile and Practical Option Double-sided adhesive strips or non-slip tape can offer an instant solution to sliding furniture. Simply cut the strips to size and stick them to the bottom of furniture legs. These strips provide a strong grip on hardwood floors and are easy to remove or replace when needed. Factors to Consider When Choosing a Solution The right solution depends on your specific furniture and flooring setup. Consider these factors: Furniture Weight: Heavier furniture requires stronger grip solutions, such as rubber grippers. Floor Type: Ensure your chosen solution is safe for hardwood and won’t damage the finish. Foot Size and Shape: Larger furniture legs benefit from broader gripping pads, while smaller feet may need more focused solutions. Aesthetic Preferences: Some options are more discreet than others, allowing you to maintain a sleek look. Conclusion Sliding furniture on hardwood floors doesn’t have to be a constant frustration. By implementing one or more of the solutions in this guide, you can protect your floors, secure your furniture, and create a safer, more comfortable living space. Whether you choose simple felt pads or robust rubber grippers, these methods ensure your hardwood floors remain as beautiful and functional as ever. Thinking of Reusing or Restoring Your Hardwood Floors? Let Cardenas Flooring help you transform your space with sustainable and professional solutions. Contact us to get started today! Frequently Asked Questions (FAQs) Will using rubber grippers damage my hardwood floors? Rubber grippers are generally safe for hardwood floors, but it’s essential to choose products specifically designed for hardwood surfaces. Avoid cheap alternatives with adhesives that could leave sticky residues or discolor the floor. Regularly clean the bottom of the grippers and the floor beneath them to prevent dirt buildup, which could lead to scratches. If you’re concerned, test the gripper in an inconspicuous area first. Are felt pads enough to stop heavy furniture

what-is-engineered-hardwood-flooring
Flooring Advice

Engineered Hardwood Flooring: Benefits, Installation & Maintenance

If you’re renovating or building a home, flooring is a critical decision. You want durability, beauty, and practicality rolled into one. Engineered hardwood flooring offers all this and more, making it a popular choice for modern homeowners. But what exactly is engineered hardwood flooring? How does it compare to solid hardwood? This guide delves deep into its construction, advantages, and tips for installation and care, giving you all the information you need to make an informed decision. What is Engineered Hardwood Flooring? The Basics Engineered hardwood flooring combines the natural beauty of real wood with enhanced stability and practicality. It consists of: Top Layer (Wear Layer) A thin slice of genuine hardwood, offering the authentic look of solid wood. Thickness typically ranges from 0.6mm to 6mm, with thicker layers providing better durability and refinishing potential. Core Layer Layers of plywood, high-density fiberboard (HDF), or other composite materials give the floor strength and resistance to warping. This construction enhances stability, particularly in environments with fluctuating humidity. Backing Layer A stabilizing base layer made of the same material as the core or other durable substances, providing balance and preventing cupping or bowing. This multi-layer construction is the key to engineered hardwood’s versatility, enabling it to handle moisture and temperature changes better than solid hardwood. Engineered Hardwood Flooring vs. Solid Hardwood Choosing between engineered and solid hardwood depends on your specific needs. Here’s how they stack up: Durability: Engineered hardwood resists warping and cupping, making it ideal for moisture-prone areas like basements. Solid hardwood, while durable, is more sensitive to environmental changes. Refinishing: Solid hardwood can be refinished multiple times. Engineered hardwood’s refinishing potential depends on the thickness of the wear layer, usually 1-3 times for thicker wear layers. Cost: Engineered hardwood is often more budget-friendly due to its layered construction. Installation: Engineered hardwood is more versatile, allowing for glue-down, nail-down, or floating installation methods. Solid hardwood typically requires nail-down installation. Sustainability: Engineered hardwood uses less solid wood per plank, making it a more sustainable choice. Advantages of Engineered Hardwood Flooring Why do so many homeowners opt for engineered hardwood? Here are some compelling reasons: Aesthetic Appeal The top layer is real hardwood, offering the timeless beauty of natural wood grain. Moisture Resistance While not waterproof, it handles humidity better than solid wood, making it suitable for kitchens, basements, and climates with seasonal changes. Versatility Available in a range of wood species, colors, and finishes, it fits any design style. Easy Installation Floating and click-lock systems simplify the installation process, even for DIYers. Cost-Effective: Offers the luxury look of hardwood at a more affordable price point. How to Choose the Right Engineered Hardwood Flooring When selecting engineered hardwood, consider the following: Thickness: Look for a thicker wear layer if you plan to refinish the floor in the future. Wood Species: Choose a species that fits your aesthetic and durability needs. Oak and hickory are popular for their toughness, while walnut offers rich tones. Finish: Pre-finished planks save time during installation and offer a factory-applied protective coating. Installation Method: Decide whether you’ll use glue, nails, or a floating method based on your subfloor and skill level. Installation: What to Expect Engineered hardwood flooring offers flexibility in installation. While professional installation ensures the best results, many options are DIY-friendly: Floating Installation: Ideal for click-lock planks, requiring no adhesive or nails. Great for uneven subfloors. Glue-Down Method: Provides stability and soundproofing but requires careful preparation and precision. Nail-Down Installation: Offers traditional stability but is more labor-intensive. Ensure your subfloor is clean, level, and dry to prevent long-term issues. Caring for Your Engineered Hardwood Flooring Maintenance is key to extending the life of your floors. Here are expert tips: Cleaning Routine: Sweep or vacuum regularly to remove dirt and grit. Damp mop with a pH-neutral cleaner for deeper cleaning. Avoid Moisture: Never allow water to pool on the floor. Clean spills immediately. Protective Measures: Use area rugs in high-traffic areas and felt pads under furniture legs to prevent scratches. Final Thoughts Engineered hardwood flooring strikes a perfect balance between beauty, practicality, and affordability. Whether you’re renovating a single room or your entire home, it offers the elegance of hardwood without many of the drawbacks. By understanding its construction, advantages, and maintenance requirements, you’ll be well-equipped to make the best choice for your space. Transform your home with engineered hardwood flooring, a timeless, versatile, and durable solution. Upgrade to Engineered Hardwood Flooring! Cardenas Flooring provides expert installation and engineering solutions to suit your style and needs. Contact us today to discuss your project! FAQs Can engineered hardwood be installed in moisture-prone areas? Engineered hardwood is more resistant to moisture than solid hardwood, making it suitable for areas like basements or kitchens. However, it’s not fully waterproof, so it’s not ideal for consistently wet areas like bathrooms. If installing in a basement, ensure proper subfloor preparation and consider adding a moisture barrier to enhance protection against humidity and minor water exposure. How do I clean engineered hardwood without damaging it? Clean engineered hardwood by sweeping or vacuuming with a soft brush attachment to remove dirt and debris. For deeper cleaning, use a damp mop with a pH-neutral hardwood cleaner. Avoid soaking the floor or using abrasive cleaners, as excessive moisture or harsh chemicals can damage the wear layer and finish. Can engineered hardwood be refinished? Yes, but only if the wear layer is thick enough. Floors with a wear layer of 2mm or more can typically be sanded and refinished 1-3 times. Thinner layers (below 2mm) are unsuitable for refinishing but can be lightly buffed to restore shine. Always consult a professional to assess the refinishing potential of your flooring. What makes engineered hardwood different from laminate flooring? Engineered hardwood has a top layer of real wood veneer, giving it the authentic look and feel of solid wood. Laminate flooring, on the other hand, uses a photographic image of wood on its surface. Engineered hardwood is more durable, longer-lasting, and capable of being refinished, unlike laminate, which cannot be refinished and has a shorter lifespan. How long does engineered hardwood flooring last? With proper care, engineered hardwood can

how-to-remove-hardwood-flooring
Flooring Advice

How to Remove Hardwood Flooring: A Step-by-Step Guide

You’re staring down a room of hardwood floors, ready for a major transformation. Whether you’re replacing damaged boards, upgrading to a new style, or repurposing the space, removing hardwood flooring is often the first step. While it’s tempting to call in professionals, doing it yourself can save significant costs and give you the satisfaction of a job well done. Removing hardwood flooring is no small feat, but with the right knowledge, tools, and approach, you can turn this labor-intensive task into a manageable DIY project. Let’s dive deeper into each step to ensure your experience is efficient, safe, and cost-effective. Step 1: Know Your Hardwood Flooring Type Understanding the type of hardwood flooring you’re dealing with is essential. Each type—nailed, glued, or floating—requires a different removal method. Identifying this upfront saves time and ensures you use the right tools. Nailed-Down Flooring Common in older homes, nailed-down floors are often directly attached to the subfloor. While durable, they require substantial effort to remove, as each board must be carefully pried up without damaging the subfloor. Glue-Down Flooring Found in high-traffic or commercial spaces, glue-down floors are adhered with strong adhesives. Removing these often requires specialized tools like a floor scraper or oscillating multi-tool to tackle the stubborn glue residue. Floating Floors Floating hardwood floors are not attached to the subfloor, making them the easiest to remove. They are installed with interlocking mechanisms and can often be taken apart plank by plank without heavy tools. Step 2: Assemble Your Tools Having the right tools makes all the difference. Here’s what you’ll need: Essential Tools: Pry bar, hammer, claw bar, utility knife, and floor scraper. Safety Gear: Eye protection, work gloves, dust mask, and knee pads. Optional Tools: Heat gun for glue-softening and an oscillating tool for precise cutting. Cleanup Tools: Shop vacuum for debris and adhesive removal. Step 3: Preparing for Hardwood Flooring Removal Before you lift a single board, prep the room: Clear the Space: Move all furniture and décor out of the room. Protect Adjacent Areas: Use painter’s tape and drop cloths to prevent dust and debris from spreading. Check for Hazards: Inspect for electrical wiring, heating vents, or plumbing beneath the floor to avoid accidental damage. Step 4: Step-by-Step Removal Process Nailed-Down Flooring Start at an Edge: Locate a loose edge or cut into the board with a utility knife to create a starting point. Pry Carefully: Insert the pry bar under the board and gently lift. Work slowly to avoid snapping the wood or damaging the subfloor. Remove Nails: Use the claw bar or hammer to extract nails. Keep a bucket handy for discarded nails to maintain a clean workspace. Glue-Down Flooring Soften Adhesive: Use a heat gun to loosen the adhesive underneath the boards. Score the Boards: Use a utility knife to cut through the glue, creating smaller, more manageable sections. Scrape Residue: After removing the planks, scrape remaining glue from the subfloor with a floor scraper or adhesive remover. Floating Floors Identify Seams: Begin where planks meet, usually along the edges. Lift and Separate: Pry the planks apart gently. Most should click free without much effort. Work Methodically: Continue row by row until the floor is fully removed. Step 5: Clean Up Like a Pro Once the flooring is removed, thorough clean-up is essential to prepare for the next phase of your project. Remove Debris Use a shop vacuum to pick up dust and small particles. Inspect the Subfloor Ensure it’s free of nails, staples, and adhesive residue. Repair Damage If the subfloor is uneven or damaged, patch it before installing new flooring. Tips for Success: Dealing with Common Challenges Stubborn Boards: Apply additional leverage using a longer pry bar or cut the boards into smaller sections for easier removal. Adhesive Residue: For glue-down floors, an adhesive remover can save time and prevent frustration. Safety First: Always wear gloves and safety glasses, especially when dealing with sharp nails or splintered wood. Final Thoughts Removing hardwood flooring can seem daunting, but with the right preparation and approach, it’s a highly achievable DIY project. Understanding the type of flooring, using proper tools, and following a systematic process will save you time, money, and frustration. Whether you’re upgrading your space or salvaging materials, the satisfaction of a job well done is worth the effort. Happy renovating! Looking to Remove Old Hardwood Floors? Let Cardenas Flooring handle the heavy lifting with expert removal services. Contact us today to get started on your renovation! Frequently Asked Questions (FAQs) Can I reuse the hardwood flooring I remove? Yes, hardwood flooring can often be reused if it is removed carefully and remains in good condition. Reclaimed hardwood can be repurposed for new flooring projects, furniture, or decorative elements like wall paneling. However, be prepared to inspect the boards for damage, clean them thoroughly, and possibly sand or refinish them before reuse. Properly removing nails and adhesive is crucial to preserving the planks for future use. How much time does it take to remove hardwood flooring? The time required depends on the size of the area and the flooring type. For example, removing a small room’s floating floor might take 3–4 hours, while glue-down or nailed flooring could take a full day or more due to adhesive or nail removal. Factors such as the tools available, your experience, and the flooring’s condition also impact the timeline. Larger or more complex spaces may require multiple days to complete. What tools are essential for removing hardwood flooring? Key tools include a pry bar, hammer, utility knife, claw bar, and floor scraper for effective removal. For glue-down floors, consider an oscillating tool and heat gun to tackle stubborn adhesive. Safety gear, such as gloves, safety glasses, a dust mask, and knee pads, is critical to avoid injury during the process. A shop vacuum is also highly recommended to manage debris and keep your workspace clean. Can I remove hardwood flooring without damaging the subfloor? Yes, with proper technique and tools, you can minimize damage to the subfloor. Use a pry bar and hammer gently to lift boards, and work slowly to avoid

how-long-does-hardwood-flooring-last
Flooring Advice

Hardwood Flooring Lifespan: How Long Does It Really Last? A Comprehensive Guide

Hardwood floors are more than just a surface to walk on. They’re a statement of style, durability, and value. Their rich tones and timeless appeal make them a favorite choice for homeowners. However, one question often looms over this decision: How long does hardwood flooring really last? Whether you’re considering installing hardwood floors or already have them, understanding their lifespan and how to maximize it is key. This guide will unravel the factors that influence durability, provide maintenance tips, and help you make the most of your hardwood investment. Factors Affecting Hardwood Flooring Lifespan The longevity of hardwood floors isn’t a fixed number; it’s influenced by a variety of factors that work together to determine their durability. By understanding these elements, you can take proactive measures to extend their life. 1. The Wood Species: Durability Starts Here Not all hardwoods are created equal. Dense and durable species such as oak, maple, and hickory tend to last longer than softer woods like pine or fir. Oak is particularly popular for its scratch resistance and versatility, while maple offers a smooth, sleek appearance. If durability is your priority, choosing the right species is crucial. Hardwoods for High-Traffic Areas: Oak, hickory, and Brazilian cherry. Softwoods for Low-Traffic Areas: Pine or fir, where wear and tear are minimal. 2. Installation Quality: Setting the Foundation for Longevity The quality of installation plays a pivotal role in the lifespan of your hardwood floors. Proper subfloor preparation, precise measurements, and the right techniques are essential. Missteps during installation, such as uneven subfloors or poor alignment, can lead to squeaks, gaps, or premature wear. Professional installation might seem like an upfront expense, but it’s a worthwhile investment that prevents costly future repairs. 3. Maintenance and Care: Daily Habits Matter Consistent maintenance is key to extending the life of your floors. Dust, dirt, and debris can act like sandpaper, scratching the finish and dulling the surface. Regular sweeping, mopping with appropriate cleaners, and refinishing as needed will help preserve their beauty and functionality. 4. Environmental Factors: Controlling Humidity and Light Hardwood floors are susceptible to changes in humidity. Excess moisture can cause expansion and warping, while extremely dry conditions may lead to cracking. Maintaining a stable indoor humidity level (between 35-55%) with the help of humidifiers or dehumidifiers can prevent damage. Additionally, using window coverings to block direct sunlight will help reduce fading. How Long Does Hardwood Flooring Last? The lifespan of hardwood flooring can vary significantly depending on the environment, usage, and maintenance. Here’s a breakdown based on usage scenarios: High-Traffic Areas (e.g., kitchens, entryways): Expect 15–25 years with proper care. Moderate-Traffic Areas (e.g., bedrooms, living rooms): Typically last 25–50 years or longer. Low-Traffic Areas (e.g., guest rooms, spare rooms): These can endure 50+ years, sometimes even reaching a century. Engineered hardwood floors generally have a shorter lifespan, ranging from 20–40 years, depending on the thickness of the veneer and maintenance practices. Extending the Lifespan: Practical Solutions Even with the best care, hardwood floors can show signs of aging. Here’s how to address common issues and prolong their beauty: 1. Regular Refinishing: The Fountain of Youth for Floors Refinishing involves sanding the surface to remove scratches and imperfections, followed by applying a fresh protective finish. Most solid hardwood floors can be refinished 5–7 times during their lifespan, depending on the thickness. Regular refinishing every 7–10 years can keep your floors looking brand new. 2. Protect Against Water Damage: The Silent Killer Water is one of the biggest threats to hardwood floors. Clean spills immediately to prevent moisture from seeping into the wood. In areas prone to spills, such as kitchens, consider using water-resistant mats. 3. Repair Rather than Replace For minor scratches and dents, repair kits containing fillers and stains can restore the wood’s appearance. For more extensive damage, replacing individual planks is a cost-effective way to maintain the overall integrity of your flooring. 4. Preventive Measures: Little Steps, Big Impact Use felt pads under furniture to prevent scratches. Avoid wearing high heels on hardwood floors to minimize dents. Place rugs or runners in high-traffic areas to reduce wear. Final Thoughts Hardwood flooring is an investment in beauty, functionality, and value. By understanding the factors that influence its lifespan and adopting proactive maintenance practices, you can ensure your floors stand the test of time. Whether you’re installing new floors or caring for existing ones, a little attention goes a long way in preserving their timeless charm. With proper care, your hardwood floors can last a lifetime and then some! Protect and Maintain Your Hardwood Floors with Ease! Contact us now to book a service with Cardenas Flooring and let our experts handle all your flooring needs, from waterproofing to regular cleaning FAQs How often should I refinish my hardwood floors? The frequency of refinishing depends on the wear and tear your floors experience. Generally, hardwood floors should be refinished every 7–10 years for moderate use. High-traffic areas may require refinishing sooner, while low-traffic areas might go longer. Ensure enough wood remains for sanding if refinishing multiple times. Engineered hardwood can typically only be refinished once or twice due to the thinner top veneer. What’s the best way to prevent scratches on hardwood floors? Prevent scratches by using felt pads under furniture legs, placing rugs in high-traffic areas, and trimming pet nails regularly. Avoid dragging heavy objects across the floor and use soft-soled footwear indoors. Regular cleaning to remove dirt and debris is also essential, as these can cause abrasions over time. How can I tell when my hardwood floors need refinishing? Signs that your floors need refinishing include visible scratches, dullness, discoloration, or an uneven finish. If water doesn’t bead on the surface but instead soaks in, the protective layer is likely worn out. Consulting a professional for an assessment can help determine the best course of action. Can hardwood flooring be installed in humid areas? Yes, but special care is required. Choose a stable wood species like teak or engineered hardwood for better resistance to humidity changes. Acclimate the wood to your home before installation and maintain a

how-to-clean-hardwood-flooring
Flooring Advice

How to Clean Hardwood Floors: Expert Tips & Tricks for Sparkling Clean Floors

Hardwood floors are timeless. They add a sense of sophistication, warmth, and value to any home. But maintaining their pristine look can feel like an uphill battle. Whether you’re battling dull, streaky surfaces or fretting over using the wrong cleaning products, you’re not alone in your frustrations. This comprehensive guide offers the strategies, solutions, and insights you need to master how to clean hardwood flooring effectively. With the right techniques, your floors can remain a stunning centerpiece for years to come. Mastering the Art of Hardwood Floor Cleaning Cleaning hardwood floors is about much more than aesthetics—it’s about protecting your investment. The right methods can prevent unnecessary wear, damage, and costly repairs down the line. Step 1: Daily Maintenance for Immediate Impact Daily cleaning lays the groundwork for long-term floor care. By addressing dirt and debris before they accumulate, you prevent minor scratches and maintain the floor’s shine. Sweep or Vacuum Daily: Use a soft-bristled broom or a vacuum with a hardwood-friendly attachment to collect dirt, dust, and grit. These tiny particles act like sandpaper on your floors, gradually dulling their finish. Place Entryway Mats: A quality doormat is a simple yet effective barrier against tracked-in dirt and moisture. Place them both inside and outside entrances. Add Felt Pads: Attach felt pads to the bottom of your furniture to prevent scuffs and scratches when moving heavy items. Step 2: Weekly Deep Cleaning for a Polished Look Weekly deep cleaning ensures that your floors stay spotless while preserving their protective finish. Dust Mop First: Begin with a microfiber dust mop to collect any remaining dirt or debris. This step is particularly important in corners and along baseboards. Choose the Right Cleaner: Opt for a pH-neutral hardwood floor cleaner. Avoid all-purpose cleaners, which can leave a dull film on your floors. Mop with Care: Wring out your mop until it’s just damp, not wet. Excess water can seep into the wood, causing warping or staining. Mop in small sections, drying each area as you go. Step 3: Tackling Stains with Precision Accidents happen. From spilled coffee to muddy paw prints, hardwood floors face their fair share of challenges. Immediate Response: Blot spills with a clean cloth or paper towel to prevent liquids from seeping into the wood. Use Specialized Cleaners: For tougher stains, apply a hardwood-specific cleaning solution to the affected area. Always test the product in an inconspicuous spot first. Call a Professional: If a stain persists, such as ink or pet urine, consider consulting a professional to avoid further damage. Step 4: Equip Yourself with the Best Tools The right tools make all the difference when cleaning hardwood floors. Microfiber Mops: These are gentle on the surface while effectively picking up dirt. They’re also reusable, making them a cost-effective choice. Vacuum with Attachments: A vacuum designed for hardwood floors ensures that no dirt is left behind without causing scratches. Steam Mops (Use with Caution): While steam mops can sanitize, excessive heat and moisture may damage the wood. Only use steam mops on floors specifically designed to handle them. Avoiding Common Mistakes Even the most diligent cleaning routine can be undermined by common errors. Here’s what to avoid: Skipping Drying: Leaving your floors damp after mopping can lead to warping or staining. Always dry immediately with a clean microfiber cloth. Using Harsh Chemicals: Bleach, ammonia, and abrasive cleaners can strip your floors of their protective coating, leaving them vulnerable. Dragging Heavy Furniture: Always lift furniture rather than dragging it to prevent gouges and deep scratches. Final Thoughts With a consistent cleaning routine and the right tools, your hardwood floors can remain as beautiful as the day they were installed. Preventive measures, such as daily sweeping and immediate spill cleanup, are key to minimizing damage. By following these expert tips, you’ll not only extend the lifespan of your floors but also keep them sparkling, adding charm and elegance to your home. Now, armed with this knowledge, you’re ready to give your hardwood floors the care they deserve! Keep Your Hardwood Floors Beautiful! From applying protective coatings to regular upkeep, Cardenas Flooring has you covered. Contact us now for a consultation! Frequently Asked Questions (FAQs) Can I use a steam mop on my hardwood floors? While steam mops can effectively sanitize, they are not ideal for most hardwood floors. Excessive moisture and heat can seep into the wood, causing warping or cupping. If you choose to use a steam mop, ensure your floors are labeled as steam-compatible by the manufacturer and follow the product instructions carefully. When in doubt, stick to a damp microfiber mop for safer cleaning. How often should I deep clean my hardwood floors? Deep cleaning should be done every one to two weeks, depending on foot traffic and household activity. High-traffic areas like hallways or kitchens may need more frequent care. For deep cleaning, use a hardwood-specific cleaner and avoid soaking the floors. Daily sweeping or vacuuming also helps minimize buildup, making your deep cleaning sessions more effective. What should I do if my hardwood floors look dull? Dull floors may result from dirt buildup or the use of incorrect cleaning products. Start by deep cleaning with a hardwood-specific cleaner. Avoid products containing wax or oils unless your floor’s finish specifically requires them. If dullness persists, consider buffing the floors with a microfiber cloth or applying a recommended polish to restore their shine. How can I prevent scratches on my hardwood floors? Prevent scratches by placing felt pads under furniture legs, avoiding high heels indoors, and using rugs in high-traffic areas. Sweep or vacuum regularly to remove abrasive dirt particles. For added protection, avoid dragging furniture and consider using protective mats near entrances to catch debris before it reaches your floors. What’s the best way to clean up spills on hardwood floors? Blot spills immediately with a soft cloth to prevent liquids from seeping into the wood. Avoid rubbing, which can spread the liquid. Use a hardwood-safe cleaner to address sticky or stubborn spots. Quick action is crucial to prevent staining or long-term damage to the floor’s finish.

hardwood-flooring-mistakes
Flooring Advice

Hardwood Flooring Mistakes to Avoid for a Flawless Finish: A Comprehensive Guide

Hardwood floors bring elegance, warmth, and lasting value to any home. However, the process of choosing, installing, and maintaining them can be fraught with potential pitfalls. With such a significant investment at stake, the margin for error is small. Whether you’re considering a DIY installation or hiring professionals, understanding and avoiding common hardwood flooring mistakes can save you time, money, and frustration. This guide is here to help you navigate these challenges and achieve the flawless finish you’re dreaming of. Choosing the Right Wood: The Foundation of a Perfect Floor Selecting the right wood species and grade is crucial. It’s more than just picking a beautiful sample at the showroom; it’s about balancing aesthetics, functionality, and durability to fit your specific needs. Understanding Wood Species and Their Properties Each wood species has unique characteristics: Oak: Highly durable and scratch-resistant, ideal for high-traffic areas. Maple: Sleek and modern but softer, making it more prone to dents. Hickory: Tough and resilient, perfect for homes with pets or children. Choose a wood that suits your lifestyle. If your household has heavy foot traffic or pets, durability will outweigh appearance. On the other hand, if aesthetics are your top priority, softer woods might suffice for low-traffic areas. Climate Considerations: The Hidden Factor Climate plays a significant role in how hardwood behaves over time. In humid regions, wood tends to expand, while in dry climates, it contracts. Selecting a stable wood species, such as engineered hardwood, and ensuring proper acclimation before installation can prevent warping, cupping, or splitting. Ignoring climate considerations is a common yet preventable hardwood flooring mistake that leads to costly repairs. Installation: Where Precision Meets Patience Even the best hardwood flooring can look subpar if poorly installed. The installation phase is often where homeowners make costly mistakes, but with the right approach, these issues can be avoided. Subfloor Preparation: The Bedrock of Stability An uneven subfloor is a recipe for disaster. It can lead to squeaking, gapping, and uneven planks. Before laying hardwood, ensure the subfloor is clean, dry, and level. Use leveling compounds if needed, and never rush this step. A poorly prepared subfloor undermines even the finest hardwood and creates issues that are difficult to fix later. Acclimation: The Silent Protector Wood is a natural material that adjusts to its environment. Failing to let your hardwood acclimate to the room’s humidity and temperature is a rookie mistake. Allow at least 48-72 hours for acclimation to minimize the risk of post-installation problems like warping or splitting. The Right Tools and Techniques Installing hardwood flooring requires precision and the right tools. Using improper tools can lead to jagged cuts, uneven edges, or damaged planks. If you’re not confident in your abilities, hiring a professional installer is a worthwhile investment to avoid these pitfalls. Maintenance: Safeguarding Your Investment Hardwood floors require ongoing care to maintain their beauty and durability. Neglecting proper maintenance is one of the easiest ways to diminish your investment. Regular Cleaning: A Simple Routine with Big Payoffs Daily sweeping or vacuuming removes dirt and debris that can scratch the floor’s finish. Weekly damp mopping with a hardwood-specific cleaner ensures a pristine surface without damaging the sealant. Avoid using excessive water or soaking the floor, as this can lead to warping over time. Avoid Harsh Chemicals Harsh cleaning agents or abrasive tools can strip the finish and dull the wood’s natural shine. Stick to pH-neutral, hardwood-safe cleaners and use microfiber mops to avoid unnecessary damage. Protective Measures: Small Steps, Big Impact Simple precautions can extend the life of your floors significantly: Place felt pads under furniture legs to prevent scratches. Use rugs or mats in high-traffic areas to shield the wood. Maintain consistent indoor humidity to minimize expansion and contraction. Common Mistakes and Effective Solutions Even with the best intentions, mistakes happen. The good news is that many issues are fixable. Gapping and Buckling Gaps often result from improper acclimation or environmental changes. Use wood filler for minor gaps or consider refinishing for severe cases. Buckling, caused by excess moisture, may require plank replacement. Scratches and Dents Minor scratches can be buffed out using a wood repair kit, while deeper dents might require sanding and refinishing. For significant damage, replacing affected boards ensures a seamless look. Creaking Floors Creaking is usually due to an uneven subfloor or loose planks. Reinforce problematic areas with screws or nails, or consult a professional for more extensive repairs. Final Thoughts Hardwood flooring is a timeless investment that enhances your home’s aesthetic and value. Avoiding common mistakes whether in selecting the right wood, ensuring proper installation, or maintaining the floors—ensures your investment lasts for decades. By understanding potential pitfalls and addressing them proactively, you can enjoy stunning hardwood floors that remain a source of pride for years to come. When in doubt, contact Cardenas Flooring for guidance on installation, maintenance, or repairs. The extra effort and expense upfront will pay dividends in the long-term beauty and durability of your hardwood floors. FAQs What is the best way to prepare a subfloor for hardwood installation? Preparing the subfloor is crucial for a flawless hardwood flooring installation. Ensure the subfloor is clean, dry, and level. Remove any debris, repair cracks, and use a self-leveling compound if needed. For wood subfloors, secure loose boards and check for squeaks, fixing them with screws or nails. Moisture testing is essential to ensure the subfloor is not too damp, as excessive moisture can cause warping or buckling. Proper preparation provides a stable foundation, reduces installation issues, and prolongs the life of your hardwood flooring. How long should hardwood acclimate before installation? Hardwood flooring should acclimate to the room’s environment for at least 48 to 72 hours before installation. This step allows the wood to adjust to the temperature and humidity, minimizing expansion or contraction after it’s installed. For areas with significant climate fluctuations, acclimation might take longer. Spread the planks out in the room where they will be installed and avoid stacking them to ensure even acclimation. Skipping this step can lead to issues like warping, gapping,

is-hardwood-flooring-waterproof
Flooring Advice

Is Hardwood Flooring Waterproof? Facts, Myths & Solutions

Hardwood flooring is undeniably beautiful, adding warmth and elegance to any space. But the question, “Is hardwood flooring waterproof?” often sparks concern among homeowners. While hardwood offers aesthetic appeal and long-term value, the fear of water damage can overshadow its advantages. This guide aims to clarify the waterproofing capabilities of hardwood flooring, debunk myths, and provide practical tips to protect your floors from water-related issues. The Persistent Myth: Hardwood and Water Are Best Kept Apart For decades, conventional wisdom dictated that hardwood and water are incompatible. While it’s true that traditional solid hardwood is sensitive to moisture, advancements in flooring technology have made water-resistant options a viable choice. The idea that all hardwood floors are unsuitable for areas prone to spills or humidity is an oversimplification. By understanding the nuances of different types of hardwood, you can make an informed decision that balances beauty with practicality. Understanding the Types of Hardwood Flooring Not all hardwood floors are created equal. To determine whether hardwood flooring is suitable for your home, it’s crucial to understand the differences between solid and engineered hardwood. Solid Hardwood Solid hardwood consists of a single piece of natural wood, offering timeless beauty and durability. However, its porous nature makes it susceptible to water damage. Spills that aren’t promptly cleaned can lead to warping, cupping, or even mold growth. While refinishing can restore its appearance, prolonged exposure to moisture can compromise its structural integrity. Engineered Hardwood Engineered hardwood is constructed with a real wood veneer atop a core of plywood or high-density fiberboard (HDF). This layered design provides better dimensional stability and resistance to moisture than solid hardwood. While not completely waterproof, engineered hardwood with a high-quality finish can withstand minor spills and humidity better, making it a popular choice for kitchens and entryways. The Role of Finishes and Sealants The finish on hardwood flooring acts as a protective barrier against moisture. A polyurethane finish, for example, can repel spills and reduce the risk of water damage. However, no finish is entirely waterproof. Over time, normal wear and tear can diminish the effectiveness of the sealant, leaving the wood vulnerable. Regular maintenance, such as refinishing and resealing, is essential to preserve the floor’s water-resistant properties. Waterproof vs. Water-Resistant Hardwood Flooring: What’s the Difference? Many flooring options marketed as “waterproof” are engineered products designed with enhanced resistance to moisture. While these floors can withstand brief exposure to spills or minor flooding, they are not impervious to long-term exposure to water. On the other hand, traditional solid hardwood is considered water-resistant at best. Understanding this distinction helps set realistic expectations and ensures proper care. Solutions That Work: Protecting Your Hardwood Investment Whether you choose solid or engineered hardwood, proactive measures can significantly reduce the risk of water damage. Choose Engineered Hardwood: Opt for options with advanced waterproof coatings, especially for moisture-prone areas like kitchens or basements. Clean Spills Immediately: Wipe up liquids as soon as they occur to prevent seepage. Use Area Rugs: Place rugs in high-traffic zones and near sinks or entryways to minimize exposure. Maintain the Finish: Regular refinishing protects the surface and enhances water resistance. Control Humidity Levels: Use a dehumidifier to maintain optimal indoor humidity, especially during humid seasons In Closing The question, “Is hardwood flooring waterproof?” requires a nuanced answer. While no hardwood floor is completely waterproof, engineered options with advanced finishes offer excellent water resistance. By selecting the right flooring type, using protective measures, and committing to regular maintenance, you can enjoy the timeless elegance of hardwood without undue concern over water damage. Remember, understanding your flooring and its limitations is the key to protecting your investment for years to come. Don’t settle for less. Trust Cardenas Flooring for premium hardwood floor services that enhance your space. Contact us now to get started! FAQs Can hardwood flooring handle occasional spills? Hardwood floors can handle occasional spills if cleaned promptly. Solid hardwood is less resistant to water and requires immediate attention to prevent damage like warping or staining. Engineered hardwood, especially with a water-resistant finish, offers better protection against spills but isn’t completely waterproof. The key is to act fast—wipe up any liquid immediately to reduce the risk of moisture seeping into the wood. Over time, maintaining the finish is essential to ensure ongoing protection against minor water exposure. Is waterproof hardwood flooring truly waterproof? While marketed as “waterproof,” most hardwood floors are actually water-resistant. Engineered hardwood with advanced waterproof finishes can withstand spills and humidity better than solid hardwood, but standing water or prolonged exposure will still cause damage. For areas prone to excessive moisture, such as bathrooms or basements, it’s best to explore alternative flooring options, like vinyl or tile, for true waterproofing. Keep in mind that proper care and immediate spill cleanup are still necessary, even with waterproof hardwood. What should I do if water gets under my hardwood floors? If water seeps beneath your hardwood floors, address it immediately to prevent long-term damage. Use a wet/dry vacuum to remove as much water as possible and place fans and dehumidifiers to dry the area thoroughly. If you notice warping, mold growth, or a musty smell, consult a flooring specialist. In severe cases, sections of the flooring may need to be removed, dried, or replaced. Prolonged moisture can compromise the subfloor as well, so timely action is critical. Are there any hardwood options suitable for kitchens and bathrooms? Engineered hardwood with a high-quality water-resistant finish is a better option for kitchens and bathrooms than solid hardwood. These floors are designed to handle higher levels of humidity and occasional spills. However, you’ll need to take precautions like using rugs, sealing joints, and cleaning up water promptly. For bathrooms, consider pairing engineered hardwood with additional waterproofing measures, like silicone sealants around edges, to prevent seepage into the subfloor. How can I protect hardwood floors from water damage? To protect hardwood floors from water damage, start by cleaning spills immediately and using rugs or mats in high-traffic or moisture-prone areas, such as entryways and sinks. Maintain a stable indoor humidity level (between 30-50%) with dehumidifiers if necessary.

how-thick-is-hardwood-flooring
Flooring Advice

Understanding Hardwood Flooring Thickness: What to Know

Hardwood flooring thickness is an often-overlooked factor that can significantly impact the durability, functionality, and overall aesthetic of your floors. Understanding your options and their implications will help you choose the perfect thickness for your home. Let’s delve deeper into the specifics of hardwood flooring thickness, from standard measurements to practical applications and maintenance. Standard Hardwood Flooring Thickness Options Hardwood flooring comes in several thicknesses, each with unique benefits and ideal applications. Common options include: 3/8 inch (9.5mm): The Lightweight Contender This thinner option is ideal for low-traffic areas or spaces where height clearance is an issue, such as apartments or rooms with low thresholds. While budget-friendly, it may not offer the same longevity or durability as thicker options, making it better suited for secondary spaces. 1/2 inch (12.7mm): The All-Around Performer A versatile choice, this thickness strikes a balance between affordability and durability. It handles moderate foot traffic well, making it a popular option for living rooms, bedrooms, and dining areas. Its durability is adequate for most residential applications. 5/8 inch (16mm): The Sturdy Option This thickness is favored for high-traffic areas like kitchens and hallways. Its added density provides better resistance to wear and tear, making it an excellent choice for homes with children or pets. 3/4 inch (19mm): The Heavyweight Champion As the thickest standard option, 3/4-inch hardwood flooring offers unmatched durability and strength. It’s ideal for homes requiring multiple refinishing cycles and for spaces subject to heavy use. While it comes with a higher price tag, it provides long-term value. How Thickness Impacts Durability The thicker the hardwood plank, the better it can withstand daily wear and tear. Here’s why: Scratch Resistance: Thicker boards have a more robust surface, making them less susceptible to scratches and dents. Longevity: Thicker planks can be sanded and refinished multiple times, significantly extending their lifespan. Structural Stability: Greater thickness minimizes the risk of warping, especially in areas with fluctuating temperatures or humidity. Thin boards might seem like a cost-effective choice initially, but their lower durability often results in higher replacement costs down the line. Installation Considerations Based on Thickness The thickness of your hardwood flooring plays a crucial role in the installation process and overall performance of the floor. Thicker planks, such as 3/4-inch solid hardwood, require a meticulously prepared subfloor to ensure stability and longevity. An uneven or poorly prepared subfloor can cause issues such as gaps, creaks, or buckling, which not only compromise the floor’s aesthetics but also its durability over time. Thicker planks demand more precise leveling to distribute weight evenly and prevent structural problems. On the other hand, thinner hardwood options, like 3/8-inch or 1/2-inch planks, offer greater flexibility during installation. These thinner planks are often easier to install over existing flooring, such as tile or plywood, saving time and effort. However, they may lack the insulating and soundproofing benefits of thicker planks. Thicker hardwood flooring inherently provides better thermal insulation and reduces noise transmission, making it a preferred choice for multi-story homes or spaces where comfort is a priority. Refinishing Potential and Long-Term Value The refinishing potential of hardwood flooring is closely tied to its thickness, making it a crucial consideration for long-term value. Thicker planks, particularly 3/4-inch options, are built to endure multiple refinishing cycles usually 3-5 times allowing homeowners to refresh their floors’ appearance over several decades. This makes them an excellent investment, especially for spaces prone to wear and tear. In contrast, thinner boards, such as 3/8-inch options, may only withstand one or two refinishes before becoming too fragile to sand. Choosing thicker planks not only ensures greater durability but also provides flexibility to adapt to evolving design trends and wear over time. Choosing the Right Thickness for Your Needs Selecting the ideal hardwood flooring thickness involves balancing practical requirements with personal preferences. For high-traffic areas like hallways, kitchens, or living rooms, thicker planks, such as 3/4-inch boards, are essential. These provide enhanced durability and better resistance to wear and tear over time, ensuring your flooring retains its beauty in busy spaces. Budget considerations also play a critical role. While thinner boards, such as 3/8-inch options, are typically more affordable upfront, thicker planks offer superior longevity, making them a cost-effective investment in the long term. Thicker boards can also be refinished multiple times, extending their lifespan significantly. Your aesthetic goals are another important factor. Thicker planks often feature more prominent grain patterns, adding depth and character to your interior design. They create a bold, high-end look that elevates any space. Final Thoughts Choosing the right hardwood flooring thickness is a decision that balances immediate needs with long-term benefits. While thinner options are budget-friendly and suitable for less demanding spaces, thicker boards offer unparalleled durability, refinishing potential, and overall value. Consider your lifestyle, budget, and installation environment to make an informed choice. Whether you’re designing a cozy living room or a bustling kitchen, selecting the correct thickness ensures your hardwood floors remain a beautiful and functional feature of your home for years to come. Ready to restore your hardwood floors to their original beauty? Contact Cardenas Flooring for expert cleaning, refinishing, and repair services. Let us handle the hard work while you enjoy stunning, long-lasting results. Contact us now for a free consultation! FAQs What thickness is ideal for hardwood flooring in high-traffic areas? For high-traffic areas like kitchens or hallways, 3/4-inch hardwood flooring is the best choice. Its thicker profile provides enhanced durability and can withstand daily wear and tear, dents, and scratches. Additionally, it allows for multiple refinishing cycles, extending its lifespan significantly. Thinner options, such as 1/2-inch or 3/8-inch planks, may be less durable in such spaces and could require replacement sooner. Can engineered hardwood match the durability of thick solid hardwood? Yes, engineered hardwood with a thick top wear layer (3mm or more) can offer comparable durability to solid hardwood. It’s constructed with multiple layers of wood veneers, enhancing stability and resistance to moisture and temperature changes. While it may not allow for as many refinishes as solid hardwood, high-quality engineered hardwood can still last decades,

how-long-does-laminate-flooring-last
Flooring Advice

How Long Does Laminate Flooring Last? A Closer Look

On average, well-maintained laminate flooring lasts between 15 to 25 years, depending on its quality, installation, and usage. While this range gives a general idea, several factors contribute to how long laminate flooring lasts. Understanding these factors helps you make informed decisions to maximize the life of your floors. Factors Influencing Laminate Flooring Lifespan Quality of the Laminate The quality of your laminate flooring is perhaps the most significant factor in determining its lifespan. High-quality laminate flooring has a thicker core and a durable wear layer, making it resistant to scratches, dents, and wear. Reputable brands also often provide warranties that reflect the expected durability of their products. Professional vs. DIY Installation Poor installation can lead to uneven surfaces, weak locking mechanisms, or gaps that invite moisture and dirt, accelerating wear and tear. Professional installation ensures precision, minimizing risks like buckling or warping over time. Traffic and Usage Laminate flooring in high-traffic areas, such as entryways and living rooms, experiences more wear compared to low-traffic spaces like bedrooms. Households with children, pets, or heavy furniture will notice quicker degradation in busy areas unless precautions are taken. Maintenance Practices Routine cleaning and appropriate care are crucial. Spills left unattended can lead to stains or water damage, while abrasive cleaning tools may scratch the surface. Using manufacturer-recommended cleaners ensures your floors remain in optimal condition. Environmental Conditions Laminate flooring is sensitive to moisture and humidity. Excessive exposure can cause the core layer to swell or warp. Keeping your home’s temperature and humidity levels stable significantly extends the flooring’s lifespan. Extending the Life of Your Laminate Floors Maximizing the lifespan of laminate flooring requires consistent care and adopting smart practices to protect its surface. These small but impactful changes in your daily habits can keep your floors looking great for years to come. Use Protective Measures Place rugs or mats at entryways to trap dirt, dust, and moisture before they reach your laminate flooring. High-traffic areas like hallways and living rooms also benefit from area rugs, reducing wear and tear on exposed surfaces. Choose non-slip mats and ensure they are made of materials safe for laminate to avoid discoloration or scratches. Furniture Pads Add felt pads under furniture legs to protect the laminate from scratches caused by movement. This is especially important for heavier items like sofas, tables, and chairs. Regularly check and replace worn pads to ensure they remain effective. Consider using furniture sliders for larger pieces to minimize floor damage during rearrangements. Clean Spills Immediately Laminate flooring is not waterproof, so cleaning spills as soon as they occur is crucial to prevent water damage. Use a damp microfiber cloth to wipe up liquids and dry the area thoroughly to avoid seepage into seams, which can lead to warping or swelling. Routine Maintenance Regular sweeping or vacuuming removes abrasive particles like dirt and debris that can scratch the laminate’s protective wear layer. Use a soft-bristled broom or a vacuum designed for hard floors to avoid damage. Damp mop weekly with a laminate-safe cleaner for a deeper clean, ensuring the mop is well-wrung to prevent excess moisture. Climate Control Maintaining a stable indoor environment with moderate temperatures and humidity levels is essential. Use dehumidifiers or air conditioning in humid climates to prevent swelling and warping, and avoid exposing the flooring to direct sunlight to minimize fading. By following these tips, you can extend the life of your laminate flooring and preserve its appearance and functionality for many years. Signs It’s Time to Replace Laminate Flooring While laminate flooring is durable, it doesn’t last forever. Recognizing when it’s time to replace your floors is essential for maintaining a safe and attractive space: Visible Wear: Large scratches, dents, or fading that cleaning and repair can’t fix. Buckling or Warping: Signs of moisture damage, often in kitchens, bathrooms, or basements. Widespread Stains: Permanent discoloration that diminishes the flooring’s appeal. Structural Damage: Loose planks, gaps, or uneven surfaces affecting functionality. Outdated Appearance: If your floors no longer match your aesthetic preferences, a replacement may be in order. Final Thoughts So, how long does laminate flooring last? While the typical lifespan is 15 to 25 years, your choices and maintenance habits can significantly influence this range. By investing in quality materials, ensuring proper installation, and practicing regular care, you can enjoy your laminate flooring’s beauty and functionality for decades. Ready to upgrade or replace your floors? Contact  Cardenas Flooring to explore durable and stylish options that fit your lifestyle and budget. Your dream laminated floors are just a decision away! FAQs What is the best way to maintain laminate flooring to ensure it lasts longer? To maximize the lifespan of laminate flooring, sweep or vacuum regularly to remove debris that can scratch the surface. Use a damp mop with laminate-safe cleaners for deeper cleaning and avoid excessive water or steam. Protect high-traffic areas with rugs and use felt pads under furniture legs to prevent dents. Address spills immediately to prevent moisture damage, and keep indoor humidity levels stable to avoid warping or swelling. Can laminate flooring be refinished like hardwood? Unlike hardwood, laminate flooring cannot be sanded or refinished. The decorative layer on laminate floors is a printed image protected by a clear wear layer, which doesn’t allow for sanding. Minor scratches or scuffs can often be repaired with laminate repair kits, but significant damage typically requires plank replacement. Choosing a high-quality laminate with a thick wear layer can help minimize the need for repairs. How do I know if my laminate flooring needs replacing? Signs that your laminate flooring may need replacing include deep scratches, extensive water damage such as buckling or swelling, and widespread discoloration that cannot be repaired. Other signs include loose or warped planks and surfaces that have lost their protective wear layer, leading to noticeable deterioration. If repairs are no longer cost-effective, it’s time to consider a replacement. Is laminate flooring suitable for households with pets? Yes, laminate flooring is generally a good choice for homes with pets due to its scratch resistance and easy maintenance. Opt for a laminate with

Scroll to Top