Flooring Advice

how-to-repair-swollen-laminate-flooring-without-replacing
Flooring Advice

How to Repair Swollen Laminate Flooring Without Replacement

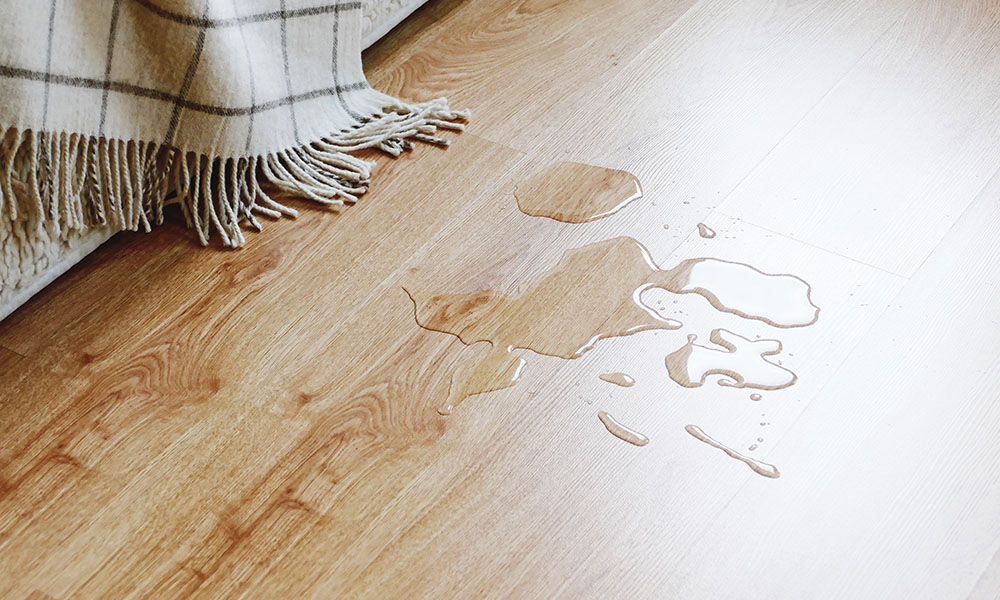
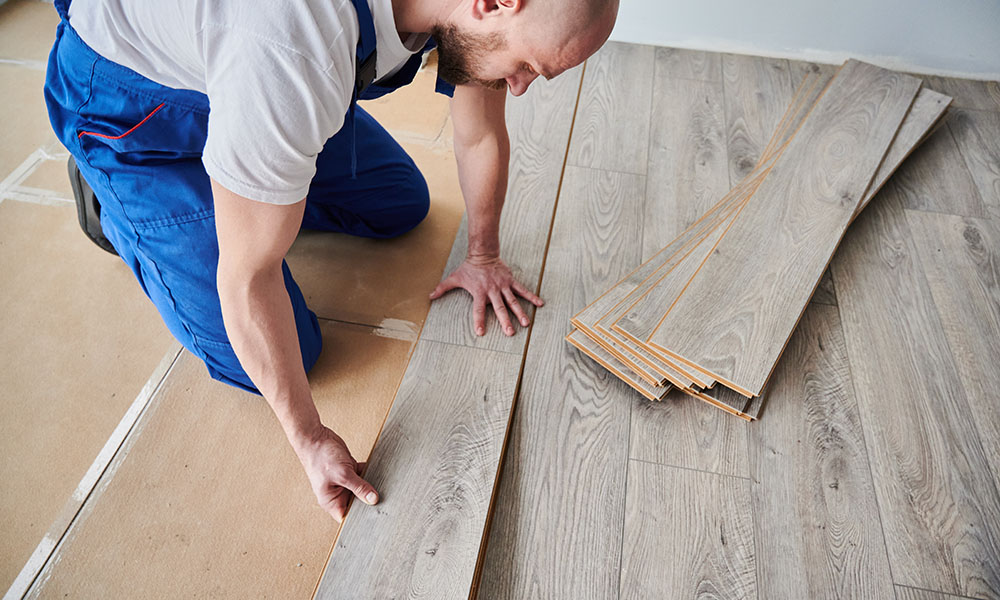
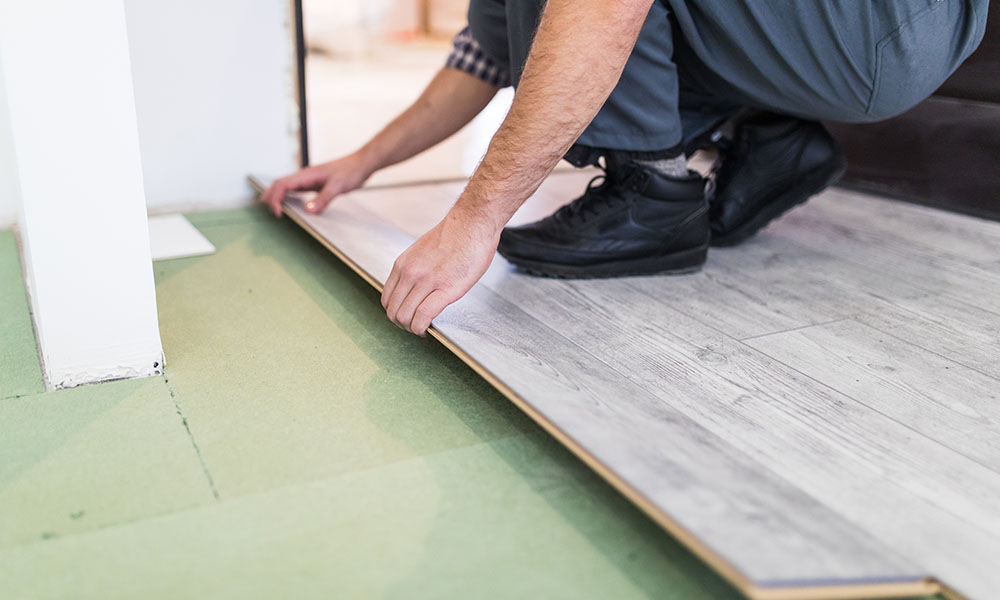
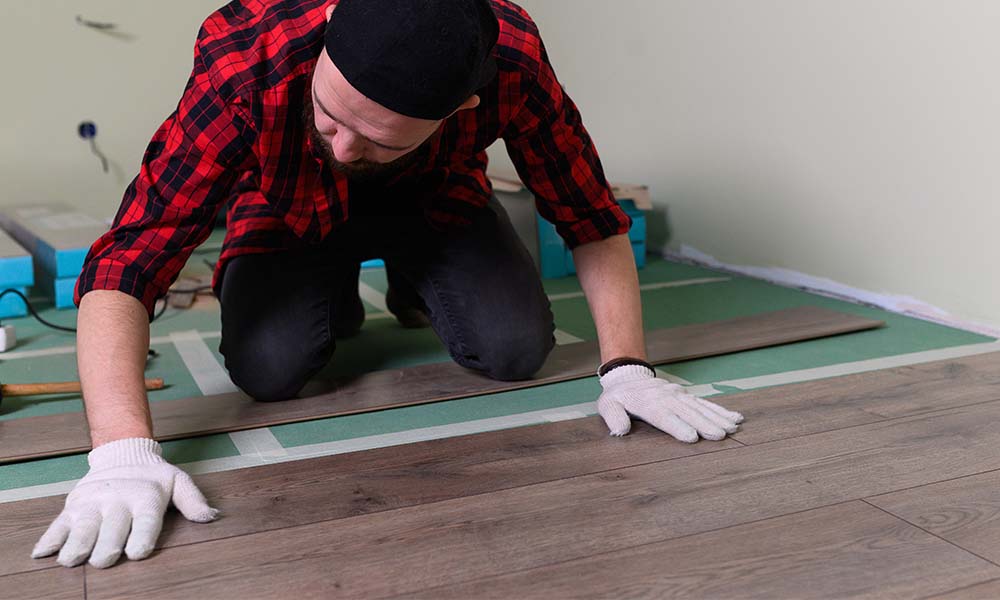
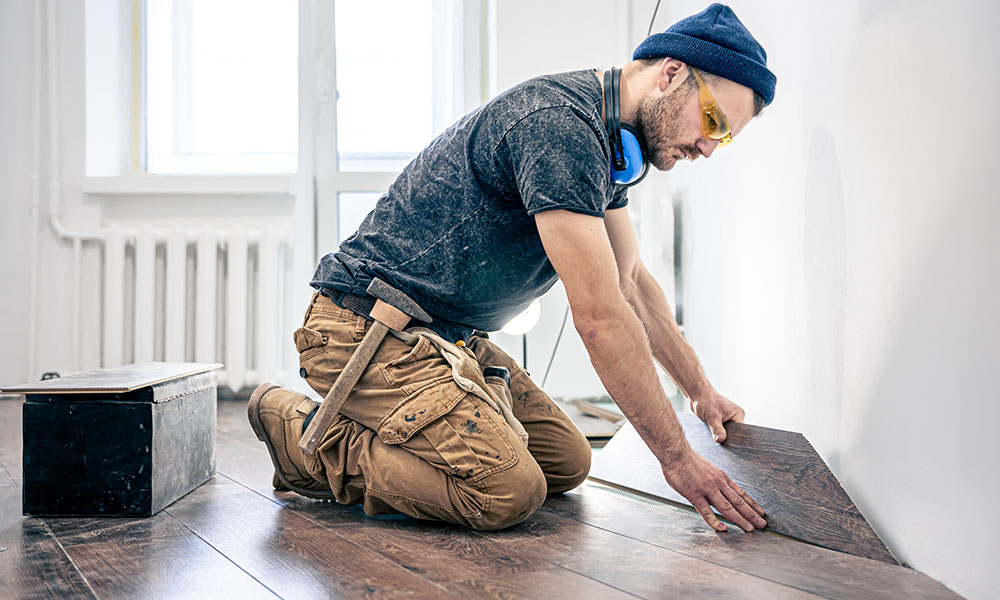
Swollen laminate flooring can feel like a frustrating defeat for homeowners. Once admired for its sleek appearance and durability, it now shows signs of swelling, warping, and unevenness. But does swollen laminate always mean expensive replacements? Not necessarily. This guide provides practical solutions to repair swollen laminate flooring without replacing it, offering a cost-effective path to restoring its former beauty. Understanding the Enemy: Why Does Laminate Flooring Swell? To address swollen laminate flooring effectively, it’s crucial to understand why it happens. Laminate flooring is constructed from layers, including a core of compressed fiberboard, which is highly sensitive to moisture. Here are the common culprits: Leaks: Persistent water from leaking pipes, roofs, or appliances can seep into the laminate. Spills: Unattended spills allow moisture to penetrate seams and edges. High Humidity: Prolonged exposure to humid conditions causes gradual swelling. Improper Installation: Gaps or inadequate sealing during installation can invite water damage. Subfloor Issues: A damp or uneven subfloor can create long-term challenges. By identifying the cause, you’ll better understand how to repair swollen laminate flooring without replacing it and prevent future damage. Assessing the Damage: Is Repair Possible? Before jumping to solutions, thoroughly inspect the extent of the swelling. Your approach will depend on the severity of the issue. Steps to Assess the Damage Check Swelling Levels: Is it minor bubbling or severe warping? Inspect Mold Growth: Mold or mildew might indicate deeper issues requiring professional attention. Determine Spread: Examine if the damage is confined to a few planks or affects a larger area. Damage localized to a few planks is often repairable without a full replacement, saving you both money and effort. Solutions for Repairing Swollen Laminate Flooring Without Replacing It 1. Drying the Affected Area For minor swelling, drying can work wonders. How to Dry: Use fans, dehumidifiers, or natural ventilation to dry the swollen area. Patience Required: Avoid rushing the process, as premature use may worsen the swelling. This simple yet effective method is ideal for minor moisture exposure. 2. Replacing Individual Planks If drying isn’t enough, replacing damaged planks might be the best option. Step-by-Step Process: Remove the swollen planks using a pry bar or utility knife. Measure and purchase replacement planks matching your floor’s color and style. Install the new planks, ensuring a snug fit. Pro Tip: Keep extra planks from the original installation to avoid mismatched replacements. 3. Using Repair Kits for Cosmetic Damage For slight bubbling or surface imperfections, a laminate repair kit may suffice. What’s Included: Repair kits often contain putty, wax fillers, and color-matching pens. Application: Use the filler to level small areas and restore the appearance of the damaged section. This method is perfect for addressing superficial damage. Preventing Future Water Damage: Proactive Measures for Lasting Floors Taking preventative measures is the best way to avoid the frustration and costs associated with repairing water-damaged laminate flooring. By addressing potential vulnerabilities and maintaining good practices, you can significantly extend the lifespan of your laminate floors. 1. Seal Gaps and Edges Proper sealing during installation is one of the most effective ways to prevent water damage. Apply high-quality sealants to the edges and seams of your laminate flooring to create a water-resistant barrier. This step is particularly crucial in moisture-prone areas like kitchens, bathrooms, and basements. Don’t forget to inspect the seals periodically; even the best sealants can wear down over time and require reapplication. 2. Use Protective Mats Strategically placing mats in high-risk areas such as entryways, kitchens, and bathrooms can act as the first line of defense against moisture. Door mats trap water brought in from outside, while rugs in kitchens and bathrooms absorb splashes and spills. Choose non-slip, water-resistant mats to ensure both safety and effectiveness. 3. Clean Spills Immediately Water left to sit on laminate flooring can seep through the seams and edges, leading to swelling and warping. Make it a habit to wipe up spills immediately with a dry or slightly damp cloth. For larger spills, use absorbent towels and follow up with fans or a dehumidifier to ensure the area is completely dry. 4. Maintain Humidity Levels Laminate flooring is sensitive to humidity fluctuations, which can cause swelling and buckling. Invest in a reliable dehumidifier, especially if you live in a damp or humid climate. Aim to keep indoor humidity levels between 30% and 50% to minimize the risk of damage. Regularly monitor your home’s humidity levels with a hygrometer for precise control. These preventative measures not only safeguard your laminate flooring but also ensure it retains its beauty and durability for years to come. A proactive approach today can save you significant time, effort, and expense in the future. Conclusion Learning how to repair swollen laminate flooring without replacing it saves both time and money. From drying techniques to individual plank replacement, you have several effective options for tackling damage. Once repaired, focus on prevention to keep your floors looking their best for years to come. A little maintenance goes a long way in protecting your investment. Need help with laminate flooring repair? Cardenas Flooring is just a call away. Contact us for reliable service today! FAQs Can I use heat tools like a hairdryer to fix swollen laminate flooring? Using heat tools such as a hairdryer is not recommended for swollen laminate flooring. Excessive heat can warp or crack the laminate, worsening the problem. Instead, rely on natural drying methods, fans, or dehumidifiers to remove moisture gradually and safely. For severe swelling, consider localized plank replacement or professional repair services to ensure effective results without further damage. How do I match replacement planks to my existing laminate floor? To match replacement planks, check with the original supplier or retailer for the same brand and style. Keep extra planks from the initial installation, if possible. If unavailable, take a sample of the damaged plank to a flooring store for assistance in finding a close match. Color-matching pens or fillers can also help minimize slight variations between new and existing planks. What if swollen laminate flooring is widespread? Can I still repair it? Widespread swelling is challenging to repair without replacement. While drying might

how-to-repair-laminate-flooring-water-damage
Flooring Advice

How to Repair Laminate Flooring Water Damage: Expert Tips

Water damage on laminate flooring can be a homeowner’s nightmare, often evoking fears of costly repairs or complete replacement. However, it doesn’t have to spell disaster. With the right tools, knowledge, and approach, restoring your floors to their original beauty is not only achievable but also more manageable than you might think. Fixing Water Damage in Laminate Flooring: What You Need to Do The first step is to act quickly. Water damage worsens over time, so addressing the issue as soon as you notice it can save you from further complications. Begin by identifying the source of the water and stopping it immediately, whether it’s a leak, spill, or burst pipe. Once the source is addressed, assess the extent of the damage. Is it confined to a small area, or has the water spread across a larger portion of the floor? This will help determine whether you need minor repairs or a more extensive replacement. Gather the necessary tools, such as a moisture meter, pry bar, replacement planks, and a dehumidifier. Remove the damaged planks carefully to avoid harming the surrounding flooring, and ensure the subfloor is thoroughly dry before installing new laminate. Preventative measures, like sealing edges and using waterproof underlayment, can protect against future damage, saving time and money in the long run. Preventing Future Laminate Flooring Water Damage Fixing water damage is a vital step, but prevention is the most effective way to protect your laminate flooring and avoid costly repairs. By adopting proactive measures, you can safeguard your investment and maintain your floors’ pristine condition for years. Here’s how to ensure your laminate flooring remains safe from water damage: 1. Address Leaks Promptly Water damage often starts with unnoticed or unresolved leaks. Regularly inspect areas prone to leaks, such as kitchens, bathrooms, laundry rooms, and basements. Common culprits include leaking pipes, dripping faucets, faulty appliances like dishwashers or washing machines, and damaged roofs. What to Do: Repair plumbing issues immediately, even minor ones. Small leaks can escalate quickly, leading to prolonged water exposure that compromises your laminate flooring. Place a tray or waterproof liner under appliances prone to leaks. 2. Clean Spills Immediately Accidental spills are inevitable, especially in high-traffic areas or households with children and pets. However, leaving water or other liquids on the laminate surface can cause it to warp or bubble. What to Do: Wipe up spills promptly using a soft, absorbent cloth or paper towels. Avoid soaking the floor with cleaning solutions; always use a damp (not wet) mop. For sticky spills, follow up with a damp cloth and mild cleaner, then dry the area thoroughly. 3. Install Waterproof Underlayment Waterproof underlayment serves as an additional protective layer between your laminate flooring and the subfloor, particularly useful in moisture-prone areas. This barrier prevents water seepage into the subfloor, which can lead to structural issues. What to Do: During installation, choose a high-quality waterproof underlayment recommended for laminate flooring. For added protection, seal seams and edges during installation. 4. Use Rugs and Mats Strategically placed rugs and mats are an excellent way to reduce direct water contact in vulnerable areas. These accessories act as a first line of defense against spills, splashes, and tracked-in moisture. What to Do: Use absorbent mats in areas prone to splashes, such as near sinks, bathtubs, and toilets. Place heavy-duty rugs at entryways to trap dirt, moisture, and debris from shoes. Ensure rugs and mats are non-slip and designed for use on laminate to avoid scratches. 5. Maintain Indoor Humidity Levels Laminate flooring is sensitive to extreme humidity changes. High humidity can cause the planks to swell, while low humidity can lead to shrinking and gaps. Keeping indoor humidity stable is crucial to preserving the flooring’s integrity. What to Do: Use a dehumidifier during humid seasons or in damp climates. During colder months, use a humidifier if the air becomes too dry. Aim to maintain indoor humidity between 30% and 50%. 6. Conduct Regular Inspections Prevention is easier and less costly than repairs, but it requires vigilance. Regularly inspecting your floors allows you to identify and address minor issues before they escalate. What to Look For: Check seams and edges for signs of water seepage or warping. Inspect high-risk areas such as underneath appliances, near sinks, and along exterior doors. Look for bubbling, discoloration, or softness in the laminate surface. Why Prevention Matters By implementing these preventive measures, you can significantly extend the life of your laminate flooring and reduce the risk of water damage. Not only is prevention more straightforward than repairs, but it’s also a cost-effective approach to maintaining your floors’ beauty and functionality. Protect your laminate flooring today, and enjoy a worry-free home environment for years to come. Conclusion Water damage can be a frustrating and costly issue, but with the right knowledge and proactive measures, you can safeguard your laminate flooring and maintain its beauty for years to come. Regular maintenance, quick responses to spills or leaks, and preventive measures like waterproof underlayment and humidity control can significantly reduce the likelihood of damage. If water damage does occur, acting quickly is essential to minimize its impact. Whether it’s a minor repair you can handle yourself or a more extensive issue requiring professional assistance, addressing the problem early is the key to protecting your investment. Don’t let water damage ruin your floors! Contact Cardenas Flooring for professional laminate flooring repair and maintenance today. Frequently Asked Questions (FAQs) Can water-damaged laminate flooring be repaired without replacing it? A: In some cases, yes. Minor water damage, such as small stains or slight bubbling, can be addressed by thoroughly drying the area and using repair kits to restore its appearance. However, extensive damage, like warping or mold, often requires plank replacement. It’s essential to assess the severity of the damage first and act quickly to prevent further issues. If unsure, consult a professional to determine whether repairs or replacements are necessary. How do I prevent water damage in high-moisture areas like bathrooms or kitchens? To protect laminate flooring in high-moisture areas, use

how-to-repair-laminate-flooring
Flooring Advice

How to Repair Laminate Flooring Like a Pro: A Complete DIY Guide

Picture this: you’re walking through your home, and that unsightly scratch or unexpected dent in your laminate flooring catches your eye. Frustrating, right? Instead of jumping straight to costly replacements, consider repairing the damage yourself. With the right tools, techniques, and a bit of patience, restoring your laminate floors can be simpler and cheaper than you think. This guide will take you step-by-step through the process of fixing laminate flooring, ensuring professional-level results. Let’s transform those blemishes into a seamless finish! Assessing the Damage: A Laminate Flooring Repair Checklist Before diving into repairs, it’s essential to determine the extent of the damage. Each type of damage requires a different approach, so start by categorizing the issue: 1. Minor Scratches and Scuffs For surface-level imperfections, repair kits with wax sticks or touch-up markers are ideal. These tools are designed to blend seamlessly with your floor’s color, covering up blemishes effectively. Always test a small, inconspicuous area first to ensure color accuracy. 2. Moderate Damage: Dents and Chips Deeper dents or chips call for precision. A wood filler, matched to your laminate’s color, can fill gaps and dents. For minor dents, a steaming method using a warm iron and damp cloth may restore the material. Once dried, gently sand the repaired area for a smooth finish. 3. Major Damage: Cracks and Breaks Cracked or broken planks often require replacement. This process involves removing the damaged plank, carefully inserting a new one, and ensuring it aligns with the rest of the flooring. Though more time-intensive, replacing planks is a durable solution for severe damage. The Tools of the Trade: Gearing Up for Repairs Having the right tools is crucial for achieving professional results. Here’s what you’ll need: Repair Kit: Includes wax sticks, markers, or color-matched fillers. Utility Knife: For precise cutting and plank removal. Fine-Grit Sandpaper: Smooths out filled areas. Putty Knife: For applying filler and leveling repairs. Replacement Planks: Ensure they match the current flooring style and color. Damp Cloth and Iron: Useful for steaming dents back into shape. Hammer and Tapping Block: For securing planks during replacement. Step-by-Step Guide: How to Repair Laminate Flooring Mastering laminate flooring repair is all about technique and patience. Follow these steps for a seamless result: 1. Prepare the Area Start by cleaning the damaged area. Remove all dirt, dust, and debris to ensure a clean surface for repair. 2. Minor Repairs: Wax Sticks and Markers For surface scratches, apply the wax or marker directly onto the affected area. Smooth the repair using a cloth or your finger. Let it dry completely for a polished look. 3. Moderate Repairs: Using Wood Filler For deeper dents or chips, apply a color-matched wood filler with a putty knife. Spread the filler evenly and remove excess material. Once dry, sand the area lightly for a smooth finish. 4. Major Repairs: Replacing Planks To replace a damaged plank: Carefully cut out the damaged section with a utility knife. Fit the replacement plank into place, ensuring it locks securely with surrounding planks. Use a hammer and tapping block to achieve a snug fit. 5. Final Touches After repairs, clean the area thoroughly. Buff repaired sections gently to blend them seamlessly with the rest of the floor. Maintaining Your Laminate Flooring: Prevention is Key To keep your floors looking pristine and minimize future repairs: Use rugs or mats in high-traffic areas. Place felt pads under furniture legs to prevent scratches. Clean spills immediately to avoid water damage. Use laminate-safe cleaning solutions for routine maintenance. Wrapping Up Repairing laminate flooring doesn’t have to be daunting or expensive. With the right tools, techniques, and a bit of patience, you can restore your floors to their original beauty. From small scratches to replacing entire planks, this guide equips you with the knowledge to tackle any challenge. So roll up your sleeves and give your laminate floors the care they deserve you’ve got this! Transform your damaged floors with Cardenas Flooring! Whether it’s scratches, dents, or plank replacements, our expert repair services ensure your laminate flooring looks brand new. Don’t wait, contact us today for professional solutions and exceptional results! FAQs Can I repair deep scratches on laminate flooring myself? Yes, deep scratches can often be repaired using a laminate repair kit that includes a color-matched wood filler or wax. Apply the filler carefully to the scratch, smoothing it with a putty knife. Allow it to dry completely before sanding lightly to achieve a seamless finish. If the scratch is too large or affects the structural integrity of the plank, consider replacing the damaged plank entirely for the best results. How can I tell if I need to replace a damaged laminate plank? Replace a laminate plank if the damage is extensive, such as deep cracks, large chips, or water swelling, which cannot be fixed with repair kits. Replacement is also necessary if the damaged area affects the surrounding planks’ fit or stability. If minor scratches or scuffs are the issue, these can usually be fixed with wax or touch-up markers instead of replacing the plank. What is the best way to match repair materials to my laminate flooring? Bring a sample of your flooring or a damaged plank to a hardware store to find a repair kit, filler, or replacement plank that closely matches the color and texture. Many repair kits come with multiple shades to blend colors for a near-perfect match. Testing the material in an inconspicuous area is always a good idea before applying it to visible damage. Can I replace one laminate plank without removing the entire floor? Yes, replacing one plank is possible but requires precision. Carefully cut out the damaged plank using a utility knife, ensuring not to damage adjacent planks. Insert the replacement plank by locking it into place and securing it with a tapping block if necessary. For best results, consult the manufacturer’s instructions or seek professional help if the damage is extensive. How can I prevent damage to laminate flooring in the future? Prevent damage by placing felt pads under furniture legs, using rugs in high-traffic areas, and

can-you-lay-wood-flooring-over-tile
Flooring Advice

Can You Lay Wood Flooring Over Tile? Here’s the Answer

You’re dreaming of replacing your cold, hard tiles with the warmth of wood flooring. The idea of removing the existing tile seems daunting expensive, messy, and time-consuming. But is it possible to lay wood flooring over tile? The answer: Yes, but it’s not always straightforward. In this guide, we’ll explore the challenges, solutions, and best practices to help you make an informed decision and achieve the floors of your dreams. Understanding the Challenges of Laying Wood Flooring Over Tile While laying wood flooring over tile is feasible, it comes with unique challenges that need addressing: Uneven Surfaces: Tile floors often have uneven surfaces, with grout lines creating dips. Without correction, these can cause squeaking or buckling in the wood flooring above. Adhesion Issues: Tile’s smooth, glossy finish can make it difficult for adhesives to properly bond. Specialized adhesives or underlayments are often required. Added Height: Installing wood over tile increases the floor’s height, potentially impacting door clearance, baseboards, and transitions between rooms. Subfloor Integrity: If the subfloor beneath the tile is damaged or unstable, issues will eventually surface in your new wood floor. Assessing the subfloor is critical. Solutions That Work: Overcoming the Hurdles Despite the challenges, there are proven solutions to successfully lay wood flooring over tile. Preparation is Key: Assessing the Existing Tile Floor Inspect tiles for cracks or looseness. Replace or repair damaged areas. Check for uneven grout lines or tile height differences. These must be leveled. Leveling the Surface Use a self-leveling compound to fill grout lines and create a flat surface. If the tile surface is severely uneven, consider professional help. Choosing the Right Wood Flooring Engineered Wood: Best for this application, engineered wood is more stable and less prone to moisture damage than solid hardwood. Floating Floors: Options like laminate or engineered click-lock wood can be installed over tile without adhesives, making them a versatile choice. Using the Right Adhesive Select an adhesive specifically designed for bonding wood to tile. These adhesives provide the necessary grip for a secure installation. Moisture Considerations Always use a moisture barrier underlayment to prevent issues caused by moisture trapped between the tile and wood. The Installation Process: A Step-by-Step Guide Transforming your tiled space with wood flooring requires careful planning and execution. Follow these detailed steps to ensure a smooth and professional-looking installation. Step 1: Clean and Prep Begin by thoroughly cleaning the tile surface. Remove all dirt, grease, and debris to ensure the adhesive bonds effectively. Use a strong degreaser if needed, and vacuum or sweep the area to eliminate dust. A clean surface is the foundation of a successful installation. Step 2: Repair and Level Inspect the tile for cracks or loose tiles. Repair these with tile adhesive or grout to create a stable base. Uneven surfaces can cause wood planks to shift or squeak, so use a self-leveling compound to smooth out any high or low spots. Allow the compound to dry completely before proceeding. Step 3: Lay Underlayment Depending on your wood flooring choice, you may need to install an underlayment. A moisture barrier is essential in areas prone to humidity or spills, such as kitchens or basements. Foam underlayment can also provide cushioning and soundproofing, improving the overall performance of your wood floor. Step 4: Apply Adhesive For glue-down installations, evenly spread adhesive using a notched trowel. Work in small sections to prevent the adhesive from drying out before the planks are laid. Follow the manufacturer’s instructions for the adhesive to ensure proper bonding. Step 5: Install Wood Flooring Start in one corner of the room and work your way outward. For click-lock planks, align and lock them into place using the recommended tools. For glue-down planks, press each plank firmly into the adhesive, ensuring tight seams for a seamless look. Step 6: Finishing Touches Trim door frames to accommodate the new flooring height. Reinstall or adjust baseboards for a snug fit. Add transition strips where the wood flooring meets other flooring types, creating a polished and cohesive finish. By following these steps, you can achieve a flawless wood flooring installation over tile, enhancing the beauty and functionality of your space. Final Thoughts Laying wood flooring over tile is a practical solution for transforming your space without the hassle of tile removal. With proper preparation, the right materials, and careful installation, you can achieve a beautiful, durable wood floor. Whether you opt for engineered wood, floating floors, or glued planks, addressing the challenges upfront ensures a long-lasting result. For complex projects, consulting a professional is always a wise choice. Transform your home and enjoy the warmth and elegance of wood flooring today! If you need assistance with tiling or flooring installation, Cardenas Flooring is your go-to partner in Texas. Contact us today to book your required service. FAQs Can I lay wood flooring over tile without removing the tile first? Yes, you can lay wood flooring over tile without removing it, provided the tile is in good condition. Inspect the tile for cracks or looseness, and ensure the surface is level. Use a self-leveling compound if needed. Engineered wood or floating floors are better suited for this process than solid hardwood, which is more sensitive to uneven surfaces and moisture issues. What type of wood flooring is best for installation over tile? Engineered wood and laminate flooring are ideal for installation over tile. Engineered wood is stable and moisture-resistant, making it less prone to warping. Laminate is lightweight, cost-effective, and easy to install using a floating method. Avoid solid hardwood, as it requires a stable, perfectly level base and is more susceptible to damage from underlying tile imperfections. Will adding wood flooring over tile raise the floor height significantly? Yes, installing wood flooring over tile will raise the floor height, typically by ½ to 1 inch, depending on the wood and underlayment used. This might require adjustments to doors, baseboards, and transitions to other rooms. Plan for these changes before installation to ensure seamless transitions and proper functionality. How do I prepare tile flooring for wood installation?

flooring-over-ceramic-tile-options
Flooring Advice

What Flooring Can You Put Over Ceramic Tile? Best Options & Tips

Tired of outdated ceramic tiles but dreading the labor and cost of removal? You’re not alone. The good news is you can install new flooring right over your existing tiles. This approach saves time, minimizes mess, and opens up endless design possibilities. In this guide, we’ll explore what type of flooring can be installed over ceramic tile and how to make the best choice for your needs. Factors to weigh while choosing new floor When choosing a new floor, it’s essential to weigh factors such as durability, aesthetics, and ease of installation. Here are the most popular options: 1. Luxury Vinyl Plank (LVP) and Luxury Vinyl Tile (LVT): Modern Versatility Luxury vinyl is a top contender for its versatility and affordability. Advantages: Waterproof: Perfect for bathrooms and kitchens. Style Variety: Available in wood, stone, and abstract finishes. DIY-Friendly: Click-lock systems make it easy to install. Thin Profile: Works well over existing tiles without raising floor height significantly. Considerations: Durability: Although resistant to water, heavy furniture can cause dents. Thermal Changes: LVP may expand or contract in extreme temperatures. 2. Engineered Hardwood: A Touch of Elegance For those who love the warmth and charm of wood, engineered hardwood offers an excellent balance between luxury and practicality. Advantages: Durability: Resists wear and tear better than solid hardwood. Moisture Tolerance: More stable than traditional wood in humid areas. Timeless Appeal: Adds resale value and aesthetic elegance. Considerations: Price: Higher upfront cost compared to vinyl or laminate. Professional Installation Recommended: Requires a level surface for the best results. 3. Laminate Flooring: Budget-Friendly and Stylish Laminate mimics the appearance of wood and stone at a fraction of the cost. Advantages: Affordability: One of the cheapest options for quality flooring. Scratch-Resistant: Suitable for homes with pets or children. Easy Maintenance: Requires little upkeep. Considerations: Moisture Sensitivity: Not ideal for bathrooms. Realism: Some patterns may appear artificial compared to natural wood or stone. 4. Carpet Tiles: Soft and Customizable For a cozy and noise-reducing option, carpet tiles are a practical choice. Advantages: Warmth and Comfort: Ideal for bedrooms or living areas. Customizable Designs: Mix and match colors and patterns. Replaceability: Easy to replace individual tiles if damaged. Considerations: Not Waterproof: Avoid using in damp areas. Allergen Concerns: May trap dust and allergens. Preparing Your Ceramic Tile for New Flooring Preparation is the cornerstone of any successful flooring project. Without the proper groundwork, even the best flooring materials may fail to meet expectations. Here’s a detailed breakdown to ensure your new flooring installation over ceramic tile goes smoothly. Clean Thoroughly Start by giving the existing ceramic tile a deep clean. Remove grease, dirt, and debris that may interfere with the adhesion of the new flooring. Use a strong degreasing cleaner or an alkaline-based cleaner to eliminate stubborn grime. A spotless surface not only ensures a smooth application but also prevents future issues such as bubbling or uneven patches. Assess the Tile Condition Inspect your tile for cracks, chips, or loose pieces. Damaged tiles can compromise the integrity of the new flooring. Repair minor cracks with tile adhesive or filler and replace any loose tiles. For more significant damage, consider whether the subfloor beneath the tile needs attention. Address Uneven Surfaces Uneven surfaces can lead to squeaky floors or visible imperfections in the final installation. Use a self-leveling compound to fill in low areas and ensure a flat base. For significant height discrepancies, you may need professional assistance to avoid complications with your new flooring. Install Underlayment (If Needed) Underlayment can provide added cushioning, noise reduction, and moisture resistance, depending on your chosen flooring type. For instance, luxury vinyl and laminate floors often benefit from a foam or cork underlayment, while engineered hardwood might require a specific moisture barrier. Always consult the manufacturer’s recommendations for compatibility. Transitioning Seamlessly Between Flooring Types When installing new flooring over ceramic tile, creating seamless transitions between rooms enhances the overall look and functionality. Reducer Strips Reducer strips are an excellent solution for height differences between the existing tile and new flooring. These strips create a gradual slope, minimizing tripping hazards while maintaining aesthetic appeal. Inlay Strips For a more decorative touch, use inlay strips made of metal, wood, or vinyl. These strips create a polished border that delineates spaces elegantly, making transitions visually appealing. Matching Colors Selecting similar hues for the tile and new flooring ensures visual cohesion. Neutral tones or complementary shades can blend the spaces harmoniously, enhancing your home’s overall design. Final Thoughts Replacing outdated ceramic tile doesn’t have to be a daunting task. By installing new flooring directly over the existing tiles, you save time, effort, and money. Whether you choose luxury vinyl, engineered hardwood, or laminate, the key to success lies in careful preparation and informed decision-making. Transform your space with a stylish and durable tiling solution that fits your lifestyle and budget. Your dream flooring is just a project away! Contact Cardenas Flooring now. FAQs Can I install any type of flooring over ceramic tile? Not all flooring types are suitable for installation over ceramic tile. Luxury vinyl, laminate, engineered hardwood, and carpet tiles are great options. Solid hardwood and other thick materials may require tile removal due to their need for a perfectly level surface. Always consult the manufacturer’s guidelines to ensure compatibility with the existing tile. Do I need to level the ceramic tile before installing new flooring? Yes, ensuring the ceramic tile surface is level is essential for proper installation. Uneven tiles or grout lines can create bumps or gaps in the new flooring. Use a self-leveling compound to smooth the surface, especially for materials like luxury vinyl or engineered hardwood that require a flat base for optimal performance. How much does it cost to install new flooring over ceramic tile? Costs depend on the flooring material, area size, and labor. Luxury vinyl costs $3–$7 per square foot, laminate is around $2–$6, and engineered hardwood ranges from $5–$15 per square foot. Additional expenses may include underlayment or leveling compound, which can add $1–$2 per square foot to the overall cost. Can I install new flooring over damaged ceramic tiles? It’s not recommended to install flooring over broken or loose

how-to-remove-tile-flooring
Flooring Advice

How to Remove Tile Flooring: A Step-by-Step Guide for DIYers

So, you’re ready to say goodbye to your old tile flooring. Whether it’s chipped, outdated, or simply no longer your style, removing tile flooring can seem like a daunting task. But fear not! With the right tools, techniques, and a step-by-step plan, even a novice DIYer can tackle this project successfully. This guide will walk you through how to remove tile flooring efficiently and safely, ensuring your home improvement journey starts off on the right foot. Assessing Your Tile Situation: Before You Begin Identifying Your Tile Type The first step in your tile removal project is understanding the type of tile you’re dealing with. Ceramic tiles are typically easier to remove due to their less dense structure, while porcelain tiles require more effort because of their durability. If you’re dealing with stone tiles, you’ll need even heavier-duty tools. Knowing your tile type helps you choose the right removal strategy and tools. Understanding the Subfloor Beneath the tiles lies the subfloor, usually concrete, plywood, or cement board. Understanding the subfloor is crucial because it determines how carefully you’ll need to work and what repairs, if any, may be needed after removal. For instance, wood subfloors require a gentler approach to prevent damage, whereas concrete subfloors can handle a bit more force. Safety First: Essential Gear Tile removal can be messy and hazardous. Always equip yourself with the following protective gear: Safety Glasses: Protect your eyes from flying shards of tile. Dust Mask: Prevent inhalation of dust, which can be harmful, especially if the tiles or adhesives contain old materials. Work Gloves: Keep your hands safe from sharp edges and abrasive materials. Sturdy Footwear: Ensure your feet are protected from falling debris. Step-by-Step Guide: How to Remove Tile Flooring Step 1: Preparation is Key Before any tiles are lifted, prep the space. Clear the room of furniture and appliances, and cover vents, baseboards, and walls with plastic sheeting to prevent dust from spreading. If you’re removing tiles in a kitchen or bathroom, shut off utilities and remove fixtures like toilets and sinks as needed. Step 2: Score the Grout Using a grout saw or oscillating multi-tool, carefully score along the grout lines. This step weakens the bonds holding the tiles together, making it easier to remove them individually. For tiles with particularly thick grout, multiple passes may be necessary. Step 3: Breaking Up the Tiles Once the grout is scored, start breaking up the tiles. Use a hammer and chisel, or a power tool like a tile scraper for faster results. Insert the chisel under the edge of a tile, tapping gently with the hammer until it lifts. Work methodically, removing one tile at a time to avoid damaging the subfloor. Step 4: Removing the Thinset After the tiles are removed, the thinset or adhesive mortar must be scraped off the subfloor. Use a floor scraper or grinder for larger areas. Thinset can be stubborn, so patience is key. Removing all traces ensures your new flooring will adhere properly. Step 5: Cleaning Up the Mess Collect all tile shards, grout debris, and dust with a shop vacuum and heavy-duty trash bags. Dispose of the debris responsibly by checking local regulations for construction waste disposal. Dealing with Stubborn Tiles and Unexpected Challenges Stubborn Tiles If certain tiles refuse to budge, don’t panic. Heat can loosen stubborn adhesive—try using a heat gun to soften the thinset. Alternatively, a demolition hammer can help break apart tiles without too much effort. Unexpected Surprises Sometimes, tile removal reveals hidden issues, such as damaged subflooring, old plumbing, or even mold. If you encounter unexpected problems, consult a professional to ensure they’re addressed before proceeding with new flooring installation. Different Approaches for Specific Subfloors Concrete Subfloors Removing tiles from concrete subfloors can be physically demanding due to the hard surface. Use heavy-duty tools like a demolition hammer for efficiency. Be prepared for stubborn thinset and take your time to ensure a clean finish. Wood Subfloors Wood subfloors require a lighter touch to prevent damage. Use smaller tools and avoid excessive force when prying up tiles. Once tiles and thinset are removed, check for any signs of water damage or rot. Final Thoughts Removing tile flooring may seem intimidating, but with the right preparation, tools, and safety measures, it’s a manageable DIY project. Whether you’re preparing for a complete remodel or simply refreshing your floors, following this guide ensures a successful outcome. Remember, patience is key taking your time ensures you won’t damage the subfloor, setting the stage for your beautiful new flooring. Good luck! Ready to transform your home through tile flooring? Contact Cardenas Flooring today for expert guidance and professional tiling solutions! FAQs Can I remove tile flooring myself, or should I hire a professional? Yes, DIY tile removal is possible with proper tools and techniques, but it requires effort and time. For larger spaces or older tiles with possible asbestos content, hiring a professional ensures safety and efficiency. Professionals have access to specialized tools and can handle unexpected challenges like damaged subfloors or hazardous materials effectively. What tools do I need to remove tile flooring? Essential tools include a hammer, chisel, grout saw, scraper, and shop vacuum. For tougher tiles, a demolition hammer or power scraper may be necessary. Safety gear—such as gloves, goggles, and a dust mask—is critical. For adhesive removal, consider a floor grinder or heavy-duty scraper. How long does it take to remove tile flooring? Timeframes vary based on the area size, tile type, and subfloor. A small bathroom may take 6–8 hours, while larger spaces like kitchens can require 2–3 days. Using power tools speeds up the process, but stubborn tiles or adhesive removal can extend the timeline. What should I do with the old tile and debris? Dispose of debris responsibly by checking local waste management guidelines. Recycling centers or construction waste facilities often accept tile debris for a fee. For large projects, renting a dumpster or using a hauling service can simplify disposal. Consider donating intact tiles to organizations like Habitat for Humanity. What type of flooring

how-to-combine-tile-and-wood-flooring
Flooring Advice

Combining Tile and Wood Flooring: A Stylish Blend

Imagine walking into your home and seeing the perfect combination of tile and wood flooring each material enhancing the other while serving its purpose. Combining tile and wood flooring is a brilliant way to add character and functionality to your space. However, executing this combination seamlessly requires attention to design, transitions, and functionality. Here, we’ll guide you through strategies, styles, and solutions to help you master this trend with ease. Defining Zones with Tile and Wood Flooring Blending tile and wood flooring is about more than aesthetics, it’s about creating zones, improving functionality, and elevating the overall design. Let’s explore some tried-and-true strategies to achieve this. Using tile and wood to define zones within an open-plan layout is a design game-changer. Tile works perfectly in high-traffic or moisture-prone areas like kitchens and bathrooms, while wood adds warmth to living and dining spaces. By transitioning from tile to wood, you not only delineate spaces but also create a visual flow that enhances the overall design. Pro Tip: When defining zones, opt for complementary colors. For example, pair light oak wood with soft, neutral tiles to achieve balance. Creating a Visual Transition with Area Rugs If a bold transition isn’t your style, an area rug can provide a subtle bridge between tile and wood. Rugs soften the visual impact of two different materials meeting while adding texture and warmth. Choose a rug that incorporates colors from both the tile and wood to create harmony. Design Tip: Go for a patterned rug in muted tones for modern spaces or a vintage piece to add character in traditional settings. Using Border Tiles for a Polished Look Adding border tiles where tile meets wood can frame the transition beautifully. This technique works well in formal dining rooms or entryways, creating a defined yet elegant boundary. Select border tiles that contrast slightly with both flooring materials to add depth without overwhelming the design. Example: A black or dark grey border can provide a striking accent between white tile and light oak wood. Strategic Placement for Functionality Practicality plays a big role in combining tile and wood. Tile is durable and water-resistant, making it ideal for kitchens and bathrooms. Wood, on the other hand, is comfortable underfoot, perfect for cozy areas like bedrooms and living rooms. Functional Design Tip: Use tile near entrances to trap dirt and moisture, and transition to wood further inside the home for a more inviting feel. Choosing the Right Tiles and Wood for Your Project The harmony of tile and wood depends heavily on your choice of materials. Matching tones, patterns, and finishes can make or break your design. Color Coordination: Achieving Harmony Stick to colors with complementary undertones. Neutral palettes work wonders—think beige tiles paired with warm honey-toned wood or cool grey tiles with ash wood. Pro Tip: If you prefer bold colors, ensure the undertones of your tile and wood align. For example, pair blue-tinted tiles with light ash wood to maintain cohesion. Texture Play: Adding Dimension Contrasting textures can elevate your design. Pair glossy tiles with matte-finished wood for a dynamic look. Conversely, textured tiles like stone can add depth when paired with smooth, polished wood. Style Idea: For rustic interiors, combine distressed wood with natural stone tiles to create an earthy, lived-in vibe. Pattern Possibilities: Geometric Harmony Geometric or patterned tiles can act as a feature element when combined with simple wood floors. This works particularly well in foyers or kitchens, where you want the tile to take center stage. Tip: Avoid overly intricate patterns that may clash with the natural grain of wood. Balance is key. Seamless Transitions: Making the Change Unnoticeable Ensuring a smooth transition between tile and wood is essential for a cohesive design. T-Molding or Reducer Strips These functional additions bridge the height difference between tile and wood while providing a clean, professional look. Choose strips in a color that blends with either flooring material for a discreet finish. Inlay Strips for a Sophisticated Touch Inlay strips made of metal or contrasting wood can elevate the transition. These strips not only enhance the design but also make the transition more durable. Design Tip: Use brass inlays for a touch of luxury in contemporary spaces or wood inlays for traditional styles. Final Thoughts Combining tile and wood flooring is a versatile and stylish solution that enhances both the functionality and beauty of your home. With thoughtful planning, the right materials, and seamless transitions, you can achieve a cohesive and stunning look. Whether you prefer bold contrasts or subtle harmony, this design choice allows for endless creativity. Ready to transform your home through tile flooring? Contact Cardenas Flooring today for expert guidance and professional tiling solutions! FAQs Is it challenging to combine tile and wood flooring? Combining tile and wood flooring can be straightforward with proper planning and execution. The key is selecting materials with complementary colors, textures, and patterns. Use transitions like T-molding or inlay strips to ensure a smooth and polished look. For more intricate designs, professional help is recommended to achieve a seamless finish. What are common mistakes when blending tile and wood flooring? Common mistakes include choosing clashing colors or textures, neglecting transition pieces, and mismatching the flooring heights. Improper planning can result in an unbalanced look or uneven surfaces. To avoid these issues, carefully select materials, plan transitions, and consider the functional needs of each area. Can I combine tile and wood flooring myself, or do I need a professional? If you have experience with flooring installation, combining tile and wood can be a manageable DIY project. However, ensuring seamless transitions and preventing height mismatches often require professional expertise. A professional installer can ensure the materials align perfectly and the final result looks cohesive. How much does it cost to combine tile and wood flooring? The cost depends on materials and labor. High-quality wood and tile may range from $10-$30 per square foot, including installation. Additional expenses may include transition strips, subfloor preparation, or leveling. Get multiple quotes from professionals to find the best value for your project. How do

how-to-stop-hardwood-floors-from-squeaking
Flooring Advice

Eliminate Squeaky Hardwood Floors: Expert Solutions

Are your hardwood floors betraying your every step with an irritating squeak? Squeaky floors aren’t just annoying—they can be a sign of underlying issues. Understanding how to stop hardwood floors from squeaking is crucial for maintaining a peaceful home and ensuring your floors’ longevity. This guide covers everything from DIY solutions to professional repairs and preventative measures. What Causes Hardwood Floors to Squeak? Before tackling the problem, it’s essential to understand why hardwood floors squeak. Squeaks typically occur due to friction between floor components or gaps forming over time. Common causes include: Loose Floorboards Over time, floorboards can loosen due to wear and tear or poor installation, creating friction when walked on. Subfloor Issues A poorly secured subfloor or gaps between the subfloor and joists can lead to squeaks. Temperature and humidity fluctuations exacerbate the problem. Humidity and Seasonal Changes Wood naturally expands and contracts with humidity. Seasonal changes can cause gaps or misalignments, leading to squeaky spots. Structural Movement Settling of the house or shifting foundations can also create gaps between the flooring materials, causing noise. By identifying the root cause, you can choose the most effective solution to stop the squeaks. DIY Solutions: Quick Fixes for Squeaky Floors If you’re wondering how to stop hardwood floors from squeaking, there are several DIY methods you can try. These are cost-effective and often resolve the issue without requiring professional help. Method 1: Powdered Lubricant Sprinkle talcum powder, graphite powder, or powdered soapstone into the squeaky joints. Use a soft brush to push the powder into the cracks. Walk over the area to distribute the lubricant evenly. Why It Works: The powder reduces friction between floorboards, eliminating the squeak. Method 2: Wood Shims Locate the squeaky area from beneath the floor if possible. Insert a wood shim between the subfloor and joist to tighten the gap. Avoid overforcing the shim, as it could cause further separation. Why It Works: Shims stabilize loose sections and prevent movement. Method 3: Screws and Nails Secure loose floorboards by driving finishing nails or wood screws through the boards into the subfloor. For a cleaner finish, countersink the nails and fill the holes with wood filler. Why It Works: This method directly addresses loose boards by anchoring them firmly. Method 4: Adhesive Solutions Apply wood glue or construction adhesive to gaps between floorboards. Use clamps or weights to press the boards together until the adhesive sets. Why It Works: Glue fills and secures gaps, reducing movement and squeaking. Professional Fixes: When to Call in the Experts Sometimes, the problem is too extensive for DIY methods. Here’s how professionals handle how to stop hardwood floors from squeaking: Subfloor Reinforcement Professionals may remove sections of flooring to secure the subfloor to the joists with screws or adhesive. This ensures a stable foundation. Injection Repair For squeaks caused by gaps, pros often use a wood adhesive injection to fill voids between the subfloor and joists without removing floorboards. Complete Floor Replacement In severe cases, where structural issues are widespread, replacing the affected area of flooring might be necessary. While costly, this ensures a squeak-free and durable floor. Preventative Measures: Keeping Your Floors Quiet The best way to handle squeaky floors is to prevent them from happening in the first place. Here’s how: Humidity Control Maintain consistent humidity levels in your home using a humidifier or dehumidifier. Ideal humidity levels for hardwood floors are between 35-55%. Proper Installation Hire professional installers to ensure your flooring and subfloor are properly secured from the start. Quality installation reduces the risk of future squeaks. Routine Maintenance Regularly inspect and maintain your floors to address minor issues before they escalate. Tighten loose boards and check for subfloor gaps annually. Use Rugs and Mats Place rugs or mats in high-traffic areas to reduce wear and tear on your hardwood floors. Tools You’ll Need for DIY Repairs Here’s a quick checklist of tools and materials you’ll need for tackling squeaky hardwood floors: Talcum powder or graphite powder Hammer and finishing nails Drill and wood screws Wood glue or construction adhesive Shims Wood filler Sandpaper Rug pads or area rugs Having the right tools ensures a smoother repair process and better results. Final Thoughts Squeaky hardwood floors are more than just an annoyance—they’re a call to action. By addressing the issue promptly with the solutions outlined in this guide, you can restore peace and ensure the longevity of your flooring. Whether through simple DIY methods or professional intervention, knowing how to stop hardwood floors from squeaking will save you time, money, and frustration. Ready to silence your squeaky floors? Contact Cardenas Flooring for expert hardwood floor repair and maintenance services. Our skilled professionals will keep your floors beautiful and quiet for years to come! FAQs Q: How much does it cost to fix squeaky hardwood floors? A: The cost depends on the severity of the issue. DIY fixes like talcum powder or wood shims can cost under $20, while professional repairs, such as subfloor reinforcement or injection solutions, typically range from $100 to $500 per area. For extensive repairs, the costs may increase significantly. Q: Can squeaky floors damage my home? A: While squeaky floors are not immediately harmful, they can indicate underlying structural issues like loose subfloors or gaps between joists. If left unresolved, these issues may worsen over time, potentially leading to more significant damage that can compromise the floor’s durability and stability. Q: Are squeaky floors a sign of poor installation? A: Not necessarily. Squeaky floors can result from natural wear, humidity fluctuations, or the settling of the house. However, improper installation, such as insufficient fastening or poor subfloor preparation, can increase the likelihood of squeaks over time. Q: Can carpeted floors squeak too? A: Yes, squeaks can occur beneath carpeted floors due to loose subfloors, gaps in the joists, or structural movement. The repair process often involves accessing the subfloor from below or removing a section of carpet to tighten loose components. Q: Do I need to remove my hardwood floor to fix squeaks? A: In most cases, no. Many

cost-to-replace-hardwood-floors
Flooring Advice

Replacing Hardwood Floors: Cost Breakdown for 2024

Replacing hardwood floors is a major investment that can enhance your home’s beauty, functionality, and value. Whether you’re replacing old, damaged flooring or updating the style, understanding the cost factors will help you plan effectively. So, how much does it cost to replace hardwood floors? Let’s break it down in this detailed guide. Understanding the Cost of Replacing Hardwood Floors Replacing hardwood floors involves several cost components, including materials, labor, and additional expenses like subfloor preparation. On average, homeowners spend between $12 to $20 per square foot, with total costs varying based on the size of the project and specific requirements. Cost of Hardwood Materials The type of hardwood significantly impacts the overall expense. Different species offer varying levels of durability, aesthetic appeal, and price points: Oak: $5–$10 per sq. ft. Known for its timeless grain patterns and durability, oak is a popular choice. Red oak offers warmth, while white oak is slightly more water-resistant. Maple: $6–$12 per sq. ft. Maple is sleek and contemporary, offering excellent resistance to wear and tear. It’s ideal for modern spaces but may cost more than oak. Walnut: $8–$15 per sq. ft. With its dark, luxurious tones, walnut is a premium option that adds sophistication to any room. Its cost reflects its high-end appeal. Exotic Woods (Brazilian Cherry, Teak): $10–$20 per sq. ft. Exotic species are visually stunning but come with higher price tags due to limited availability. Labor Costs for Replacement Labor expenses typically range from $4 to $8 per square foot, covering removal, preparation, and installation. Factors affecting labor costs include: Removal of Old Flooring: $1–$3 per sq. ft. Removing old hardwood, especially if it’s glued down, can be labor-intensive and increase costs. Subfloor Preparation: $1–$2 per sq. ft. Preparing the subfloor ensures a smooth and level surface, preventing issues with the new flooring. Installation: $4–$8 per sq. ft. Installation costs vary depending on the complexity of the project and the method used (e.g., nail-down, glue-down, or floating). Additional Costs to Consider When replacing hardwood floors, additional costs often arise. It’s essential to factor these into your budget to avoid surprises: 1. Disposal of Old Flooring Disposing of old hardwood can cost between $200–$500, depending on the volume of material and local disposal fees. Recycling options may be available but could add to labor time. 2. Finishing Prefinished hardwood eliminates finishing costs, but if the wood is unfinished, you’ll need to budget for sanding, staining, and sealing. This adds $2–$5 per sq. ft. to your total cost. 3. Repairs and Subfloor Replacement Damaged subfloors must be repaired or replaced before installation. Repairs may cost $100–$500, while full replacement adds $2–$4 per sq. ft. to your expenses. 4. Customizations Specialty designs, such as borders, inlays, or herringbone patterns, add a touch of elegance but come at a premium, ranging from $10–$30 per sq. ft. Factors That Influence Replacement Costs Several variables can impact how much it costs to replace hardwood floors. Understanding these factors will help you manage your budget more effectively: 1. Size of the Area The larger the space, the higher the cost. While bulk discounts on materials may apply, labor costs increase proportionally with the project size. 2. Geographic Location Costs vary by region, with urban areas often having higher labor and material expenses due to demand and transportation logistics. 3. Type of Installation The installation method affects both labor and material costs. Glue-down installations are more complex and therefore pricier than nail-down or floating methods. 4. Timeline Rush jobs requiring expedited timelines may incur higher labor fees. Planning ahead can help you avoid these additional costs. DIY vs. Professional Replacement While DIY hardwood floor replacement can save you labor costs, it requires advanced skills and tools. Mistakes during removal or installation can lead to costly repairs, negating the savings. Professional services ensure precision, durability, and often include warranties, making them a worthwhile investment for many homeowners. Final Thoughts Replacing hardwood floors is a significant investment that enhances the beauty and value of your home. By understanding how much it costs to replace hardwood floors and the factors involved, you can make an informed decision that aligns with your budget and style preferences. Ready to upgrade your home with stunning new hardwood floors? Contact Cardenas Flooring today for expert advice and professional installation! FAQs 1. How much does it cost to replace hardwood floors? Replacing hardwood floors costs between $12 to $20 per square foot, depending on materials, labor, and additional factors like subfloor preparation and disposal. For a 1,000 sq. ft. area, expect to pay $12,000–$24,000 on average, though exotic woods or custom designs can increase costs. 2. How long does it take to replace hardwood floors? Replacing hardwood floors typically takes 7–10 days. This includes removing old flooring, preparing the subfloor, and installing new hardwood. Custom designs or extensive repairs can extend the timeline, so plan accordingly to accommodate any potential delays. 3. Can I replace hardwood floors myself? Yes, replacing hardwood floors can be a DIY project if you have the necessary tools and skills. DIY can save $4–$8 per square foot, but mistakes during installation or subfloor preparation may lead to costly repairs. Professional help ensures a flawless finish. 4. How often should hardwood floors be replaced? Hardwood floors can last 50–100 years with proper care. Replacement is typically required when the flooring is severely damaged, has excessive water issues, or when a homeowner desires a modern aesthetic update. 5. Are there eco-friendly hardwood flooring options? Yes, eco-friendly options include FSC-certified wood, which ensures sustainable harvesting practices, and reclaimed hardwood, which gives old wood a new life. These choices are environmentally responsible and often comparable in price to traditional hardwood flooring options.

how-much-do-hardwood-floors-cost
Flooring Advice

What’s the Cost of Hardwood Floors? A Complete Guide for 2024

Hardwood floors are a timeless investment, offering elegance, durability, and value to any home. But the big question remains: how much do hardwood floors cost? This guide dives deep into every factor influencing hardwood flooring prices, ensuring you make an informed decision tailored to your needs and budget. Factors That Influence the Cost of Hardwood Floors Understanding the variables that affect hardwood floor costs is essential for creating a realistic budget. From material selection to installation specifics, here’s what you need to know: 1. Type of Hardwood The type of hardwood you choose is the biggest determinant of cost. Solid Hardwood: Priced between $5–$15 per square foot, solid hardwood is cut from a single piece of wood. It’s highly durable and can be sanded and refinished multiple times, making it a popular choice for longevity. Engineered Hardwood: Costs range from $3–$10 per square foot. It consists of a veneer of real wood layered over high-density fiberboard or plywood. This structure makes it more resistant to moisture, ideal for areas like basements or humid climates. However, it can only be refinished a limited number of times. 2. Wood Species Different wood species come with varying costs, influenced by their availability, durability, and appearance. Budget-Friendly Choices: Domestic species like oak, maple, and birch are widely available and cost between $5–$10 per square foot. These woods are durable, versatile, and suitable for most homes. Premium Woods: Walnut, cherry, and ash range from $10–$15 per square foot. Their unique grain patterns and rich tones make them favorites for upscale interiors. Exotic Options: Brazilian cherry, teak, and mahogany are priced at $15–$25 per square foot. Their rarity and distinct aesthetics cater to those seeking exclusivity and luxury. 3. Grade of Wood The grade of wood reflects its visual characteristics and quality: Select Grade: Minimal knots and blemishes, offering a clean, uniform look. This grade is the most expensive. No. 1 Common Grade: Features some natural imperfections like knots or color variations, adding character while remaining cost-effective. No. 2 Common Grade: Known for its rustic charm, this grade is more affordable and ideal for achieving a farmhouse or vintage aesthetic. Installation Costs: Professional vs DIY The cost of installation is another critical factor when asking, how much do hardwood floors cost? 1. Professional Installation Professional installation ensures precision, includes subfloor preparation, and minimizes the risk of errors that could lead to costly repairs. On average: Labor Costs: Installation typically costs $4–$8 per square foot. This includes laying the planks, securing them, and ensuring even alignment. Subfloor Repairs or Leveling: If the subfloor requires preparation, expect to pay an additional $1–$3 per square foot. This step ensures the hardwood lays flat and lasts longer. Additional tasks like removing old flooring or installing baseboards can also increase the cost. For a 1,200-square-foot area, professional installation ranges from $5,000 to $10,000. 2. DIY Installation Installing hardwood floors yourself can save $4–$8 per square foot, making it a cost-effective option. However, DIY installation requires: Tools: Essential tools include nail guns, saws, and sanders, which can cost between $200 and $500 if you don’t already own them. Time Commitment: DIY installation for 1,200 square feet could take several weekends, depending on your experience level. While DIY offers savings, the risk of mistakes—like uneven planks or improper alignment—could reduce the floor’s lifespan and lead to expensive repairs. Maintenance Costs for Longevity After installation, maintaining your hardwood floors is essential to protect your investment. 1. Cleaning Supplies Keeping hardwood floors clean is a relatively low-cost endeavor: Hardwood Floor Cleaners: Specialized cleaners cost $10–$20 per bottle. These products are designed to remove dirt without damaging the finish. Microfiber Mops: Investing in a quality mop costs $20–$50. These tools are gentle on the floor while effectively removing dust and debris. Annual cleaning supplies average $50–$100, depending on your floor area and household activity. 2. Refinishing Costs Over time, your hardwood floors may lose their luster due to scratches and wear. Refinishing helps restore their shine: DIY Refinishing: Costs $1–$3 per square foot and involves sanding the floor and applying a new finish. Professional Refinishing: Ranges from $4–$8 per square foot. Professionals use industrial equipment and expertise to ensure an even finish and flawless results. Refinishing every 7–10 years can extend the life of your hardwood floors, making it a crucial long-term investment. Additional Costs to Consider 1. Subfloor Preparation A sturdy subfloor is critical for hardwood installation. Repairing or leveling the subfloor costs an additional $1–$3 per square foot. This step ensures the wood planks lay evenly and prevents future warping or squeaking. 2. Moisture Barriers Adding a moisture barrier is essential in areas prone to humidity or dampness, such as basements. Vapor barriers cost approximately $0.50–$1 per square foot, protecting your investment from water damage. 3. Customizations Unique design features like herringbone patterns, borders, or inlays can elevate your hardwood flooring but add $2–$5 per square foot. Customizations are an excellent way to personalize your space but require additional labor and materials. Final Thoughts Hardwood flooring is a significant investment, but its beauty, durability, and value make it worthwhile. Whether you’re opting for oak’s timeless charm or walnut’s luxurious allure, understanding the costs will help you make an informed decision. Now that you know how much do hardwood floors cost, take the next step and transform your home with stunning hardwood flooring! For expert advice and installation services, contact Cardenas Flooring today. Let us help you achieve the perfect hardwood floor for your home! FAQs How much do hardwood floors cost per square foot? Hardwood flooring costs range from $5–$25 per square foot depending on the wood type, grade, and species. Solid hardwood is more expensive, while engineered hardwood offers budget-friendly options with comparable aesthetics and durability. Is hardwood flooring worth the investment? Yes! Hardwood floors increase property value, provide unmatched durability, and can last 50–100 years with proper care. They also enhance the aesthetic appeal of your home, making them a worthwhile long-term investment. Can I install hardwood floors myself? Yes, but DIY installation requires precision and the right tools. While it saves $4–$8 per square foot, errors like uneven planks or improper

Scroll to Top