Hardwood flooring is synonymous with elegance, warmth, and durability. However, the challenge arises when your subfloor is plywood.
Can you achieve a professional, stunning finish? The answer is a resounding yes! With the right tools, preparation, and techniques, you can successfully install hardwood flooring over plywood and elevate your home’s aesthetic.
This guide provides an expert walkthrough, ensuring your dream of hardwood floors becomes a reality.
Preparing the Plywood Subfloor: The Bedrock of Success
1. Inspect and Repair
Examine the plywood for damage, loose boards, or gaps. Replace damaged sections and secure loose boards using screws to create a sturdy base.
2. Level the Surface
Using a long level, check for unevenness. Apply self-leveling compound to low spots to ensure a flat surface—this step is critical for preventing squeaky or uneven floors.
3. Clean Thoroughly
Sweep, vacuum, and wipe the plywood to remove dust, debris, and adhesive remnants. A clean surface promotes better adhesion and ensures a flawless installation.
Selecting the Right Materials
Solid Hardwood vs. Engineered Hardwood
- Solid Hardwood: Timeless and refinable, ideal for dry environments.
- Engineered Hardwood: Engineered hardwood is moisture-resistant and dimensionally stable, better for humid conditions or basements.
Choosing Underlayment
A quality underlayment provides a moisture barrier, sound insulation, and a smooth surface. Options include foam, cork, and rubber. Select one that suits your climate and flooring type.
Acclimating Your Hardwood
Allow your hardwood planks to acclimate to the room’s temperature and humidity for 3–7 days. This step minimizes expansion or contraction after installation, ensuring a long-lasting, stable floor.
Step-by-Step Installation Guide
1. Plan and Measure
- Measure your room dimensions.
- Plan the board layout to minimize waste and ensure an aesthetically pleasing result.
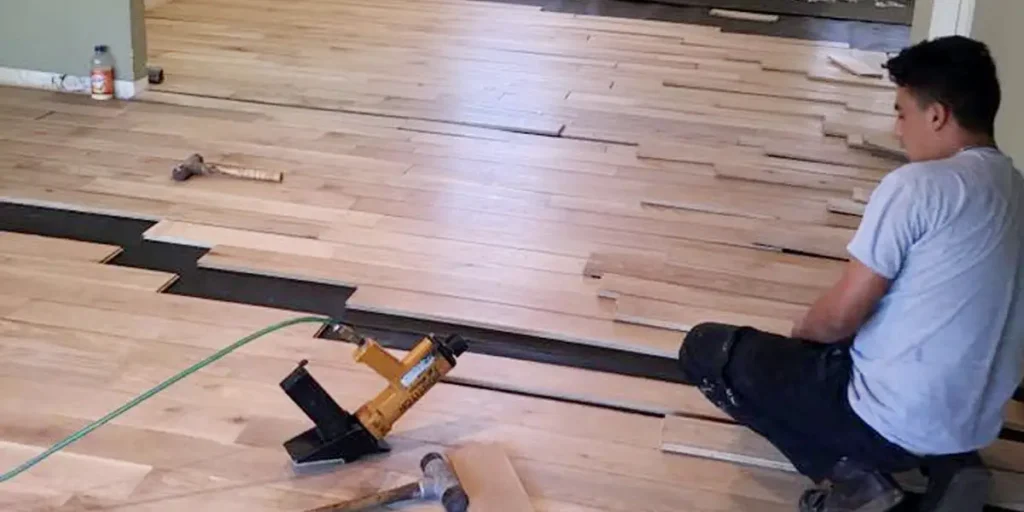
2. Install the First Row
- Start along the longest, straightest wall.
- Leave a 1/4-inch expansion gap using spacers.
- Secure planks with nails or adhesive based on your chosen method.
3. Lay Subsequent Rows
- Stagger seams for a natural look.
- Use a tapping block to fit planks tightly.
- Check alignment frequently to maintain straight rows.
4. Cut and Fit
- Use a jigsaw for intricate cuts around pipes and doorways.
- Measure carefully to ensure a snug, seamless fit.
5. Finish with Baseboards and Transitions
- Install baseboards and transition strips to cover gaps and provide a polished appearance.
Finishing and Maintenance
Protecting Your Investment
- Sweep Regularly: Prevent scratches by removing debris.
- Avoid Excess Moisture: Use a damp mop sparingly.
- Add Furniture Pads: Minimize wear from heavy furniture.
Refinishing Options
Solid hardwood allows for sanding and refinishing to refresh its appearance, adding decades to its lifespan.
Common Installation Challenges and Solutions
Installing hardwood flooring on plywood can be a rewarding DIY project, but it’s not without its challenges. Addressing potential issues upfront ensures a smooth process and long-lasting results. Here’s a closer look at common installation challenges and their solutions:
Uneven Subfloor
An uneven subfloor is one of the most critical challenges, as it can compromise the stability and appearance of your hardwood flooring. Uneven surfaces lead to creaky or wobbly floors and may cause gaps or misalignment in your boards over time.
Solution:
Before installation, thoroughly inspect the plywood subfloor for high spots, dips, or warping. Use a self-leveling compound to even out any irregularities. Follow the manufacturer’s instructions to mix and apply the compound, ensuring it fills low spots and creates a smooth surface. Allow it to cure fully before proceeding. Skipping this step can lead to costly repairs down the road.
Gaps Between Planks
Gaps often occur due to improper spacing during installation or inadequate acclimation of the hardwood to the room’s temperature and humidity. These gaps not only detract from the aesthetics but can also allow debris to accumulate, potentially damaging the floor.
Solution:
Ensure the hardwood planks are properly acclimated to the room for at least 48-72 hours before installation. Use spacers during installation to maintain consistent expansion gaps along the walls. If gaps appear after installation, carefully disassemble the affected planks and reinstall them securely.
Squeaky Boards
Squeaky floors can be a major nuisance and often result from loose plywood sections rubbing against the joists.
Solution:
Secure all loose plywood sections to the joists with screws before installing the hardwood flooring. Use a drill to tighten screws evenly across the subfloor. This proactive step eliminates the potential for squeaks and ensures a firm foundation for your hardwood.
Wrapping It Up
With this guide, installing hardwood flooring on plywood becomes a manageable and rewarding project.
From preparation to maintenance, each step contributes to a durable and beautiful floor. Take your time, follow the process carefully, and enjoy the timeless charm of hardwood in your home.
For additional support or professional assistance, don’t hesitate to contact Cardenas Flooring experts. Your stunning new hardwood floor awaits!
Frequently Asked Questions (FAQs)
Can I install hardwood flooring directly over plywood without underlayment?
While it’s possible to install hardwood flooring directly over plywood, underlayment is highly recommended. It provides a moisture barrier, sound insulation, and cushioning, which enhances the flooring’s durability and comfort. Without underlayment, moisture can seep through, and the floor may develop squeaks or uneven spots. Always consult the manufacturer’s instructions for specific requirements.
How do I know if my plywood subfloor is suitable for hardwood flooring?
Your plywood subfloor must be clean, dry, and level to ensure proper installation. Inspect for damage, loose sections, or gaps. The subfloor should be at least 3/4-inch thick to provide adequate support for hardwood. If you notice significant imperfections, repair or replace the damaged areas before proceeding with installation. A sturdy base is critical for a lasting hardwood floor.
What’s the best way to prevent squeaky floors after installation?
Squeaky floors often occur due to loose subflooring or improper installation. Before installing hardwood, ensure the plywood is securely fastened to the joists using screws. Adding underlayment also helps minimize noise. Post-installation, if squeaks persist, identify the affected areas and address them by adding screws or adhesive under the floor.
How can I maintain my hardwood flooring to keep it looking new?
Regular maintenance includes sweeping or vacuuming to remove dirt and debris that can scratch the surface. Use a damp mop with a wood-safe cleaner for deeper cleaning. Avoid excessive water and harsh chemicals. Protect the floor with furniture pads and rugs in high-traffic areas. Promptly clean up spills to prevent stains and warping.
Can I install hardwood flooring over an uneven plywood subfloor?
No, an uneven subfloor can lead to problems such as gaps, creaking, and premature wear. Use a long level to check for uneven spots. Apply a self-leveling compound to correct low areas and sand down high spots. A level and stable subfloor is crucial for achieving a professional and long-lasting hardwood flooring installation.


